Site Navigation:
Craig's twitter feed:
Tweets by @gevmage
I took a work trip to Pittsburgh, PA last week. It was for a computer training seminar, so I spent it indoors without much chance to take photos.
I noticed a rather odd thing driving up. All the way across eastern Ohio, there are signs for the city of "Wheeling", which is a small-ish city on the east end of I-70 within Ohio. Just across the border into Pennsyvania is the Pittsburgh metro area, which is much larger and would make a much more logical choice for "this highway to" signs. I presume some Ohio administrator decided at some point that they didn't want to point people to a city in aother state, no matter how large or prominent.
It was a rather dreary cloudy day, so my phone camera wasn't coping
very well with the low light. That coupled with the fact that take
these photos use-the-force point-and-shoot style meant that I didn't
get very many usable photos at all. Here are a couple from the drive
up:


My purpose for this post is this photo. I'm told this buildin in
central Pittsburgh is called "The Cathedral of Learning"; I think it's
a building in the University of Pittsburgh. It's really quite
something. I hope I get a chance to go inside sometime.

The late lamented RS "Bob" Hoover (the VW guy, not the famous pilot) was fond of saying that "your'e the mechanic in charge". My take on what he meant was that no matter what any expert may tell you, you're the person on the spot who has the ability to see what's what. You're ultimately responsible for your work, not the people on the internet trying to give you advice.
I try very hard to keep those words in mind when I work on my vintage VW. The problem with any vintage vehicle is it has a mix of old and new parts, and both sets have been maintained by different people with different levels of skill and care. ANY time you install or replace anything in a vintage car, it's vital that you don't just slap it on, you must work mentally work through what that thing is going to do, and how it relates to the parts around it. You need to anticipate what might to wrong and investigate it (by moving the part, or checking the configuration, or whatever). If you just fasten it on and don't think about it, if it turns out to be NOT an identical replacement, it will fail or jam at the most imopportune moment. Then you'll be faced with digging out the error and figuring out what you did wrong and then put it back.
My case in point was carburetor floats. I assumed they were all the same. I've dis-assembled and re-assembled carbs at least a dozen times since I've owned my vintage VW, and up until last year, the float wasn't something I ever thought about. Last year, I did a few hundred miles of test drive in my car. In preparation for doing so, I assembled a carburetor, just like I had many times before. I drove it on several test drives, ending with a 200 mile drive that included about 30 miles on the interstate. The next time I drove the car, a few days later, I backed it out of the garage, it died and wouldn't start. I spent the next week fighting with the carburetor and fuel pump. I'll use a more recent carburetor to illustrate what happened.
Here's one of the recent carburetors that I've built. Although the
float bowl is dry, I'm holding it up at the hinge so that it sits
about horizontally, where it would sit if there was gasoline in the
bowl. You're looking down at the float bowl; the top half of the
carburetor is removed. The float is the dark colored rectangular
piece; its upper corners are marked with green dots.

The float can slide a little bit to the right and left on its hinge
pin, but it's in no danger of scraping the sides of the float bowl
(marked with red dots). The float can ride up and down freely (fit
and function).
The trouble I had last year with the carburetor build was it seems
there are multiple sizes of carburetor floats of this type in the
world. The float of the carb that I had a problem with just just a
teeny bit longer (about 1.3mm longer, IIRC); its far edge was about
where the red line is marked on the same photo:

You'll notice that the upper left corner is very near the edge of the
float bowl. What had happened was I'd put in a slightly larger float
without realizing it. I didn't thorougly check its range of motion.
I then drive the car several times, including a long trip, and had no
trouble. Suddenly, one day, the float drifted to the left a bit,
scraped the edge of the bowl and sort of wedged there. When the float
is in its upper position, it closes the needle valve so no gas goes
in. So the engine wasnt' getting gas.
I have no idea why there is a different size of carburetor float; maybe its for a completely different carburetor, but someone happened to put it in a VW carb, and so it ended up in my parts bin. But I didn't carefully check its fit, and that could have stranded me somewhere.
Last Tuesday, the Space Shuttle Discovery flew on its carrier aircraft from Cape Kennedy in Florida to Dulles Airport near Washington DC, where it will be housed at the Udvar Hazy branch of the Smithsonian Air and Space Museum.
Here they are taxiing out (I watched the takeoff on TV; the photos are of the screen)

And takeoff!


The Discovery is special for several reasons that I won't go into. She is currently the longest lived space vehicle that's ever returned to eath (space stations last much longer, but they don't re-enter intact). Discovery logged just over year in space total.
The other reason is when I visited NASA's vehicle assembly building,
Discovery was sitting in one of the vertical bays awaiting transport:

(This photo is of me, with my mobile, with Discovery in the background, taken by someone else on the tour.)
Sorry for the scruffy face. I'd planned to stay in a hotel the night
before during my drive, but it seems that every hotel in the entire
northern half of the state of Florida was booked that night, so I
ended up sleeping in my car at a rest stop.
There was a Mooney fly-in event at the Tennessee Museum Of Aviation last February. My wife and I went along to meet people, see the museum, and do the sit-in-the-cockpit game with some folks that I'd talked to before ahead of time.
My experience with our club's Cessna aircraft was that an iPad didn't
fit between the yoke horns. It seems that a Mooney yoke is wider; it
fits fine:

The museum itself has the usual stuff; engines, vintage fighters.
There's a fairly old Willy's Jeep, which was kind of cool. What
completely surprised me coming around a corner at the back side of the
museum was this:

It's a full-scale model that someone made of the
Airwolf helicopter
from the television show. The creator took a Bell 222 (upon which the
"real" Airwolf was based), made it into a model, then donated it to
the museum. It was utterly unexpected and I was totally floored.
It's nice to be surprised sometimes.
We keep having periodic humming in our pipes. STILL. We it in the pipes when we moved in, and the water company guy told us we needed to have the restrictor valve replaced. We did that, and it changed. And mostly went away. But for the last year, it's been happening with much more frequency.
I'd convinced myself that it was because we had a long horizontal pipe
run between the entrance to the house and where it starts feeding
fixtures in the house. So I put a U-bend in the pipe right in the
middle of that run:

Well, that didn't work. I dont' think it even modified it much. I'm gratified that I was able to splice a fairly major piece of pipe in the middle of a run in PVC, but it didn't achieve its purpose.
We discovered that the U-bend didn't fix it just as I was about to leave the house on a trip. One major difficulty with this series of problems is that the phenomenon is very difficult to reproduce reiliably. Even when it's doing it, sometimes it won't happen for days at a time, so it's very difficult to be able to go down there when it's happening.
When it did it again, I went downstairs, and
realized that the source of the vibration itself seems to be a point
just after the entrance to the house. If I held my hand firmly on
the elbow, it would stop all together. So as a stop-gap, I tied two
heavy objects to the pipe near that point to try to dampen the
vibrations:

I used the book-end and the camshaft because they were handy. The
book-end is upside-down because that way it doesn't slide off of the
cable tie.
I'm not sure when round 3 will be. If damping the vibrations by tying things to the pipe doesn't work, then we may need to call a plumber out again and try to find the problem for real.
And now an excuse for some pretty pictures.
For those who don't know the specifics, a carburetor is a fuel metering device. In a carbureted car, the air coming into the engine goes through the carburetor before going to the cylinders. The carburetor mixes fuel mist into the air stream so that the air/fuel mixture that arrives in the cylinders has the proper ratio to burn and drive the engine. Carburetors are sort of complicated in their design because they must provide a proper fuel/air mixture over a wide range of temperatures, engine speeds, throttle settings, and other parameters.
Modern cars put fuel into the air with fuel injection systems, which decide how much fuel is appropriate for each situation using an electronic look-up table. However, a carburetor does this by mechanical parts that change their behavior depending on the conditions.
One behavior in particular that engines have is that when the engine itself is cold, fuel going into the engine tends to condense on the inside of the intake manifold, which means some of it doesn't get to the cylinders. This causes a "lean" running condition (not enough fuel per volume of air) and the engine doesn't run as well. Carburetors typically compensate for this using what's called a "choke". It's a flapper valve at the entrance to the carburetor. When closed, it restricts the air flow going through the main part of the carburetor. It doesn't actuall "block" air from going through, but it does create suction in the middle part of the carburetor so that more fuel is sucked into the air stream.
Here are a few photos of what we're talking about. Here's a few down
the throat of a 34PICT-4 carb.

Up on the photo is toward the front of
the car, right is to the right. The forward (top of picture) part of
the carb is the fuel bowl; it's marked with red dots on this photo.
The thing on the right marked by green dots is the part that controls
the choke; we'll talk about that in a bit.
This air passage that goes from top top bottom in the carburetor;
we're looking down from above.

Closest to us is the choke, shown here completely open; the shaft is
marked with blue dots. Farther down the throat is the venturi (green
dots), which is a restriction that causes air flow to drop in pressure
and suck air out of the fuel nozzle, which is marked with red dots.
At the bottom of the carburetor, farthest away from us, is the
throttle, which controls how much fuel/air goes into the engine
(that's connected to the accelerator pedal). The throttle shaft is
marked with yellow dots.
Here's the same view, showing the choke closed.

One question is how is the choke controlled. Well some vehicle/carburetor combinations have a manual choke; there's a control that opens and closes it. You'll see manual chokes on things like chain saws or small gardnen equipment with gas engines, or early carbureted cars. After the 1950s or 60s, most cars had an automatic choke of some sort. It would start with the choke mostly closed, and then open it slowly. The carburetors in air-cooled VW engines used a thermo-electric choke.
Here's the electric choke element from a 34PICT series carburetor

The middle of the choke element is a bi-metallic spring. When cold,
the spring holds the choke closed. When the spring heats up, it
slowly opens the choke over a period of a bit over two minutes. The
spring hooks the end of the choke control arm right where it's marked
with a red dot.
The bi-metallic spring in this carburetor doesn't respond directly to the heat of the engine. It's heated by an electric heater element, indicated by the green arrow in the above photo. When you turn the ignition key to "on", battery voltage is delivered to the heater element through the tang on the outside of the choke element (marked by a blue dot). So the thermo-electric choke basically acts as a timer, opening the choke steadily.
I got a bunch of carburetor work done this weekend. I installed a 34PICT-4 in my vintage Beetle and ran it on Sunday. I realized on Saturday that I'd put in the throttle plate upside-down, so Sunday I fixed that. The carb's not running right, but perhaps good enough to be an on-the-road spare. Later Sunday I spent time deciding if I could resurrect one of the other 34PICT-4s that I have to replace it.
A quick illustration so that people can see what I'm on about. Here
are two carburetors, a 34PICT-3 on the right (that's the most common
carburetor for the dual-port aircooled engine), and the 34PICT-4
(one-year-only California spec carb) on the left.

You're looking at the left side of each carburetor. The forward part
of each carb (to the left in the picture) is the float bowl, where the
gasoline sits. The 34PICT-4 on the left has the thermostatic valve
circled, and an arrow points to the corresponding point on the right.
Pangur feels about the same way as most mechanics about carburetor
work.

Here's the engine running with the 34PICT-4 on Sunday.

You can just barely see the tell-tale brass plug that is the external
part of the thermostatic valve.
I've spent a lot of time digging up test equipment to use on my
vintage Beetle. It turns out that there's a modern tool that has the
tachometer and dwell functions and ALSO is a timing light. It's an
Equus
5568 timing light, but it has all the other functions built-in.
Here's mine in use:

I'm trying to rehabilitate a couple of the old 34PICT-4 carbs that
I've bought. I tried running them through the dishwasher; that
cleaned them up a bit, but not dramatically.

The problem with all the carburetor's I've had to some degree is that air leaks into the carburetor around the throttle shaft. This messes up the fuel-air metering and makes the idle unstable and difficult (or impossible) to adjust. The 34PICT-3 that is currently my one good carb has had its bushings replaced. I had the 34PICT-4 that I'm attempting to use re-bushed as well, but perhaps it wasnt' done correctly, or something went wrong.
So what I'm doing now is I'm cleaning up one of the used 34PICT-4
carbs I have and I'm going to see if I can re-bush it myself. Long
ago I bought a set of solid brass throttle shaft bushings from someone
in England who had some. I'm goin to try installing them into the
best 34PICT-4 that I'm cleaning up. Here's a pic of dry-fitting the
bushing into the throttle bore.

So hopefully next weekend I'll see how much of a difference I can make
with that.
I bought some Mooney instruments from ebay last fall. They were from a late 1960s model, which is the sort of thing I'm hoping to buy in a few short years.
The turn coordinator in those Mooneys was dual powered; that is, it
would work powered by the airplane's instrument vacuum source, OR via
electrical power. The motor in the gyro is apparenlty a multi-phase
AC motor powered by a DC to AC inverter. In the TC that got, someone
had cut the cable from the inverter to the instrument itself.

You can sort of see the back of the TC chassis in the background.
That's the valves and plumbing for the "Positive Control" wing leveler
system. The post-1965 planes had a system that basically used the
TC's sensitivity to bank to kepe the wings level (and thus roughly a
constant heading). It was operated by vacuum; thus the hoses coming
off the back of the TC to controll the parts of the PC system.

The other half of the system. This takes DC input and creates 3-phase
AC to the TC.

So I cut up the cable and spliced each wire together.

Then I tested it by connecting the DC input to the inverter to a test
DC power supply. It worked! That was pretty fun.
I'm certainly not unique in having had posters of Lamborghini Countaches on my walls when I was a kid. I'd probably still have at least one around, if I hand't lost a bunch when got some water in our basement in 2005.
The design is frankly kind of crude. It has very little aesthetic sense whatsoever. The body is all flat panels; like the designer started with clay base and then whacked off facets witha matchete. It's a bit like a formula-1 car stretched sideways sot hat it has two seats.
I've had a re-surgence of interest in high-end cars in the last few years, watching Top Gearon BBC TV, where they drive those types of cars all the time. Interestingly, a lot of their take on the Coutach as a car to own is negative. Jeremy Clarkson is the mouth of Top Gear (he's described himself as the "bombastic one" among the hosts. Interestingly, he's written an editorial on why NOT to buy a supercar at all; that it won't improve your love life, and so on, which is very interesting for someone in that business. His article includes this:
This is because, when you are in a supercar, you can resist stabbing the loud pedal for very long periods of time but eventually, you'll think, "Hang on. This bit of road looks appropriate, I'll open the taps." And that's a mistake, because no road is appropriate really for the savagery that results. Quickly, then, you will soil yourself.There's also a segment of Top Gear in which Jeremy basically lays it out that the Countach "was never a good car" at all.
And I know all that. And I probably wouldn't like driving one
anyway. And given that only slightly over 2000 were ever made, and
they still sell for not less than $120,000, and insuring one is
astronomical, there's no way I'd ever be able to afford one. And yet,
I still find them compelling. I bought a couple of books on them
recently, because I was buying stuff on Amazon.

The cover picture is the LP500 prototype, of which only one was ever
made. It's a fairly photogenic car if you like that sort of thing:

Now many years later, what this book has pictures of that I haven't
ever seen is the incredibly integreated drivetrain:

It's technically a "mid-engined" car, which means that the engine is
between the transmission and the final drive. I'd alwyas imagined
(and drawn) that the transmission had a piece that stuck out to the
side and the drive shaft ran back beside the engine. Well that's not
the case; the transmission/engine oil pan has a passage at the bottom
for the drive shaft to pass through. This means that the
transmission/engine/final drive system must be removed from the car as
one massive piece, with special jigs, rather than being able to remove
and work on one of the three in isolation.
Coming full circle--the REAL reason that the Counatch is part of the furniture of my mind is less because of the car itself, and more than it was in a bad 1980s TV show called Automan. The show was sort of a reversal of (and ripoff of) the ideas of TRON; a computer character comes into the world (and fights crimes and solves mysteries and the usual stuff). In addition to Automan himself, he had a "cursor" that could create physical objects, including vehicles. Vehicles that weren't specifically desguised to make them look "real" were basically physical wire-frame models. The (cursor-created) car that Automan drove was a Lamborghini Countach LP400 with the wire-frame treatment. The car was super-powered, and could make instant 90-degree turns at any speed; a standard gag was to show the interior of the car during these turns, which didn't effect Automan at all but the human occupant got slammed sideways.
I got some time to work on the new carburetor for my vintage Beetle
over the weekend, so that's nice. I cleaned all the small parts that
have gasoline in them; there they are set out to dry.

Keep an eye on
the thermostatic valve at the top just right of center; we'll be
seeing that again.
During the assembly process. Judging by the look on Pangur's face,
I'm obviously doin it wrong.

To me, it seems like it actually starts to become a carburetor rather
than a collection of parts when the float is in the float bowl:

The reason that I'm assembling a fairly rare 34PICT-4 carburetor rather than the much-more-available 34PICT-3 is that the -4 has thermostatic valve that increasess the amount of gasoline that comes out the accelerator pump when the carburetor body is cold. I'm hoping that makes the car work better when the engine is cold, particularly when the weather is cool out.
For that to happen, the thermostat valve that I install has to actually work. I ended up buying a couple of 34PICT-4 carbs, so I have three thermostatic valves. On Sunday I basically decided that none of them worked. I did some digging on the internet, and e-mailed some people, and posted on forums, and came to the conclusion that all three of the valves I had were broken.
The part that's supposed to move is down inside the valve, but you can
get at it with a punch. Figuring I had nothing to lose, I put one of
the valves in my bench vice, stuck a flat punch down inside, and hit
it with a plastic mallet.

(The arrow points to the thermostatic valve.) No change. I hit it really hard with a
plastic mallet; again no improvement. Finally, I hit the punch really
hard with a steel claw hammer, and it gave. I was able to break the
ball valve free of its seat. So I know have what seems to be a
working thermostatic valve. When I get back from my work trip I'll
try and assemble the carb to see if it will work.
Cooking times for poultry in the cook book are listed by weight of the bird you're cooking, and they're different depending on whether it's stuffed or unstuffed. It seems, however, that they're missing a very very important factor, possibly the most important one.
I learned to cook Turkey from my mother in law, and I'm not generally much of a cook, so I follow the receipt very closely, so there tends to be very little variation in how I do it. One of the things that I kept having to leave myself notes about is that the cooking times for turkey in the cook book are WRONG. A covered turkey cooks faster than one uncovered, for one thing. We've had Thanksgiving dinner at our house quite a bit since we moved here, and the problem we keep having is that the turkey cooks faster than we expect.
This last Thanksgiving, I read my notes and I realized I'd plan properly, and put the turkey in later so that it arrived at a nice early dinner time. So I did--and it was the longest-cooking turkey ever. It took the better part of 6 hours, which is very long for a 15-pounder. The only significant deviation from normal cooking procedure was I decided to pick up a disposable Aluminum-foil cooking pan from the store when I got the turkey. I assumed that it was insignificant in terms of cooking. Well, we ended up eating well after 7pm, so perhaps it wasn't so insignificant.
I was so annoyed about it that I went out a bought another turkey right after Thanksgiving last year, same brand, almost exactly the same weight, and put it in the freezer. I wanted to try it again with the original roasting pan, to see if it was back to the original cooking speed. We did that dinner yesterday. The same receipe, techniques and procedures as always. Same person doing it, same oven, same temperature, same thermometer. The only difference from last Thanksgiving was we went back to the black roasting pan that we'd always used in the past, with an Al foil cover, as always.
Here are the results. The horizontal axis is time, shifted so that
they start roughly at the same time. Vertical is the temperature read
in the breast meat by the same thermometer. The green line is the
temperature from last Thanksgiving with the oven at 325 F. The red
line is Thanksgiving after I turned the oven up to 350. The blue line
is yesterday (again with oven at 325).
It stops when we turned the oven off because the
turkey was getting done too fast.

So just to be clear: green and red line: disposable aluminum foil
roasting pan (shiny). Blue line: black roasting pan.
It's nice occasionally nice to be dead right. And the cats got turkey liver, so that's all right.
Our doorbell didn't work when we moved in 6 years ago. Thinking back, I think the reason was the doorbell ringer mechanism was inside the furnace air return, so it got clogged with dust. Instead of trying to fix it, I used the existing from doorbell button to a drive relay which turns on a beeper upstairs. That system is great during the day when I'm in my office, but very much not when we're home, particularly we don't hear it when we're watching TV.
I bought a replacement ringer/bell unit, and as shown below, finally
installed it. First off, I used painters tape to get everything level
and aligned and marked, then drilled a hole into the wall towards the
closet to pass the wires:

Interestingly, someone ran wiring up the middle of the cavity, which
electrical code really discourages you from doing.
There are TWO jacketed feed wires
inside the wall, not connected to the verical posts inside the wall.

I did push the wires aside and drilled through the other side of the
wall, so I can pull wires up through the closet.
Now before installit it I removed all the painter's tape, leaving the
mounting holes and the big hole in the center that will bring the
wires in.

Finally the doorbell chassis installed. Hopefully the wiring will be
finished soon so that both main doors have a doorbell that people can
actually use.

The wiring will take a little time, as I have to join the AC and DC
sides of the doorbell circuits together.
The Experimental Aircraft Association in Oshkosh, Wisconsin, sponsors a series of two-day weekend workshops that each the skills for buildin Experimental Amateur-built aircraft. Before this year, I'd taken two of the weekend courses, and this January, I took a third, the avionics (Aviation Electroncs) and wiring course. The workshops travel around the country so that people in different regions can take the courses, but they always have a full set in Oshkosh at the end of January.
I drive around central Illinois a lot, driving on I-74 is pretty much
par for the course. However, when I exit onto I-39 northbound by
Bloomington, Indiana, it usually means I'm going to Wisconsin, and
more often, Oshkosh:

The last time I went to a January workshop, 3 years ago or so, the
travel up was horrid and snowy. That didn't happen this time, but
there was a dusting of snow both mornings I got up there:

Parking outside the EAA museum is always a good thing:

Here's what greeted participants at the start of the class. Yay,
wire and connectors!

The really nice thing about a class like this is that the bag on the
left contains fairly nice tools (crimpers and such) so that you can
get used to making the connections the way they're meant to be made.
We made a wiring harness for a cockpit intercom.

The connector at the left plugs into the back of the radio. The two
white wires at the bottom connect to power and ground. The two shielded
wires going to the two connectors at the upper right are for the
pilot's headset.
I've done lots of soldering work before, so this
part wasn't new. It was useful to learn the technique of setting up a
shielded wire. When we were finished, each of us plugged out harness
into an actual intercom to test it.
What I had NOT done before was some of the crimping techniques. A
piece of wire with some random connectors and crimps.

Also, starting with this, a piece of RG-58 cable:

stripping it:

attaching the center pin:

and finally ending up with a working BNC connector:

is something I'd never done before and was totally worth the cost.
The final project was a mini electrical system.

One power supply (a battery). One fuse. Two circuits, controlled by
a single switch. The black thing on the left of the panel is the fuse
holder. The thing in the middle is the switch to turn on the lighting
circuits. The light on the left is wired the same way as the
navigation lights on an airplane; on or off. The right light goes
through the rheostat (controlled by the knob on the right of the
panel) which acts like a dimmer. When you turn on the switch, the
"navigation" light comes on full brightness. The rightmost light,
which acts as an instrument panel light, comes on with them. You
control the brightness of the "instrument" light with the knob on the right.
Switch on, instrument lights at full brightness:

Switch still on, but instrument lights dimmed considerably:

My wife and I took a short weekend vacation over the winter to the
Sevierville, Pigeon Forge, Gatlinburg area of Tennessee. While we
were there, we visited the
Hollywood Star Cars Museum in
Gatlinburg. It has some interesting cars from movies or owned by
movie stars. It also has some other interesting artifacts, like the
Batcomputer from the 1960s Batman series:

They have a neat array of props from James Bond movies, including
a Golden Gun prop from "The Man With The Golden Gun":

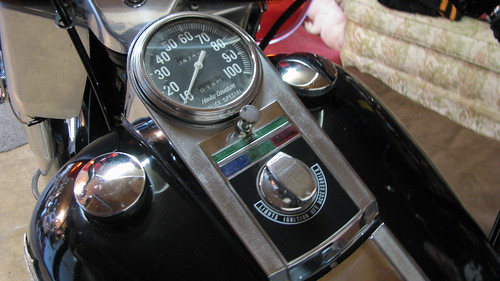
Among its vehicles, it has one of the motorcycles used in "Terminator
2". It's a 1990 Harley Davidson Fatboy. I took this image of the
overall bike:

And then one quick shot of the instrument panel

Because my wife really isn't into car museums.
I late found myself looking at the second photo a lot on my phone,
looking at the speedometer and light panel:

The bottom of the panel, just below the key switch, are very clearly
warning and function lights. The red light in the lower rightis
probably the oil pressure warning light. The green one in the center
bottom is probably the "neutral" indicator light. The lower left blue
one is probably the high-beam headlight indicator. But are the other
colored things in the next row up lights, or just trim?
It took me a while to figure out why this one photo of this motorcycle was obsessing me so (meaning a couple of hours for an evening googling photos trying to find better depictions). My revelation was--I'm obsessed with instrument panels of vehicles. I'm not sure why this was a revelation. Whenever I got on a trip I take pictures of my own instrument panel, or particularly of the rental car I'm driving. One of the things that facinates me about my vintage Beetle is the extremely austere instruments: one speedometer dial, which an embedded fuel gauge, and two warning lights. When I look at an airplane for sale, I want to look at the instrument panel more than pictures of the outside of the airplane.
I found an few interesting depictions with Google image searches: an article on howstuffworks.com on the Harley Fatboy, and another specifically on the "grey ghost" on harley-fatboys.com.
Then I started doing some searches on YouTube, and ran into some interesting stuff. Here's a couple of videos featuring someone starting and running a Fatboy where you can see the instrument lights when they turn on the ignition: here and here.
After I ran into those examples, I did some more thorough searching for images, sometimes including for-sale sites. Here's a for-sale ad for a 1992 Harley Fatboy in Tennessee. If you click on the "more photos" link, the middle photo has a nice view of the speedometer/instrument cluster in bright light.
I found
a very nice image of the tank and speedo by Carl Johan on flickr:
I found some other photos on flickr,
including
this one by Stacey Warnke, which I think is the very same
motorcycle. The other photos near it in her photostream are of other
cars in that same museum. The image shows the odometer milage of 727
miles, and the page says the photo was taken on July 31, 2008. The
odometer in my photo, taken January 2012, lists has 732 miles:

People talk a lot of "new paradigm"s, but they don't really mean it. They usally just mean a different way of doin something, which is useful, but it's not the same thing.
Many people (and certainly HR firms) have proclaimed how much the internet has changed things. I don't a lot of that is hyperbolic; a lot of what the internet has done has smoothed out barriers of informatoin and access and completed what was started by the industrial revolution.
Information and searching really is starting to have a major influence on the process of artists getting recognition. With search engines and digital music distribution, many artists are becoming independent of the system of a record lable taking all the financial risk, supplying all the advertising, but presumably taking a lot of the profit.
I'm not trying to introduce this topic; lots have written about it. I'm just commenting on it, and getting to some fun and interesting interactions with some artists that I've had because of that. It's neat that bands have enough fan base to put out limited editions of albums that core fans will buy. It give the band a way to generate revenue for the album right out of the gate, and it makes a neat limited-edition thing for the fan to have. A few years ago, Nine Inch Nails put out a special album package, which included a vinyl record of some of the songs along with some other stuff. While their story is good, they already had many years under a record label to gain a fan base.
It's been fun to interact with some other artists that are building
their own fan base independently of any record company. The
singer/songwriter Jonathan
Coulton became reasonably famous a few years ago when he did "a
thing a week" which, in his case, was to perform and record a youtube
song. Last year, he released his new album "Artificial Heart", and
like NIN above, sold a special limited-edition collectors package (I
bought one). It contained a device with ALL of his former songs on
it, plus the ones from the album. PLUS a record, and some other
stuff. Absolutley hilariously, when you took off the outer cover,
there's a pair of white archival gloves inside:

(I presume for openin the rest of the package without scuffing it.)
If you haven't heard Jonathan's music, look him up. He's smart, and
hilarious, and nerdy. There are TONs of videos on YouTube made from
his songs. I encourage everyone to buy his songs and his stuff. He's
awesome and must be supported.
Which brings me to the real point of this post. One of the artists that I've followed is over the last couple of years is Molly Lewis, who's an extremely accomplished musician and songwriter. She primarily plays the Ukelele, but also plays guitar and lots of other stuff. She's done covers of things, but she's also composed some really great songs, like a really funny one about Lincoln being assasinated (trust me). I love her stuff (with just one exception) but just about my favorite bit I've seen her do was her song "It all makes sense at the end" that she did for w00tstock with Jason Finn. Here's their performance of it in Seattle.
Molly is just finishing her senior year of college, and then she's going to try to do music for a living. A couple of years ago, she did a lot of blogging, but she's been pretty busy this year. To get back into the swing of things, she's doing a "Video per day" for the month of April. So far, as of yesterday (the 4th) she's kept a steady pace. I myself have fallen off the blogging wagon, which makes me sad, so I'm going make her vlogging a challenge to myself to the month of April to blog every day. I'm already behind, but I'm going try to catch up quickly. I want to have at least one photo in every post, because I think that's cool. Although some posts may split because of size, I won't split posts just to be lazy. And I won't just have lame posts that are just links to other posts.
I won't do a seconary blog about music (or blogging) either, excpet perhaps if I do indeed end up blogging for the whole month, I'll talk about this again in the last post of the month and do a wrap-up.
One of the big pieces of infrastructure built during the Apollo moon program was the Vehicle Assembly Building. It's the really big building at the Kennedy Space Center where they stacked the rockets for the Apollo missions and also assembled the Space Shuttles for launches.
It's a really huge building, and an giant industrial space, and with things moving around inside occasionally, it's a safety issue as well. With all those issues, before recently it was a VIP-type tour that you had to at least know someone to get to see the inside of. Starting in November, NASA opened the building up to the general public. I drove down to Florida this last weekend to take the tour and see it.
It's pretty cool, and really really huge. I'm posting a few photos here. I took a lot more of the inside. While the experience is neat, the pictures don't really show much because there's no reference or scale.
Here's a photo of the outside of the VAB:

The VAB is on the left, and the two buildings on the right are two of the
Orbiter Processin Facilities, where they reforbished the Space
Shuttles after every flight. The two tall vertical grey sections on
the VAB are the doors that open to let stacked vehicles out. They go
most of the height of the building.

Here's a different angle. The next shot is goin to be from fairly
close to the building, showing roughly the area that's circled in
green on this photo.

This shows the bottoms of the two grey doors on one side of the
building. Notice the area between them, circled.

Those tiny openings highlighted in the last shot are three
double-width personnel doors. That gives you an idea of the size of
the VAB.
Now, the VAB is very very cool for a rocket nerd like me. However, I'd like to recommend the Apollo/Saturn Center at Kennedy Space Center for anyone who's even vaguely interested in space travel. It's a really well-put-together museum out on the NASA property. They have a really impressive collection. Apparently the way it works is that you take one of the bus tours to see the launch pads and stuff, which end at the Apollo Saturn Center. You can then take a bus from there back to the main visitor's center, where the big parking lot is.
The centerpiece of the Apollo Saturn Center is an actual Saturn V rocket, which was the rocket that took the Apollo missions to the moon. The first (bottom) stage of the Saturn V was powered by 5 F-1 engines, each of which developed 1.5 million pounds of thrust. This is a photo of the business end of the Saturn V there:

Here are a few goofy road-trip type pictures from the trip down and
back. Here's the interstate sign when I-75 splits off south from I-40
west of Knoxville.

I was pretty cranky on the way down, and I really horrid traffic
problems. That was apparently the spring break that everyone and
their dog was going to Florida. The rest of the pictures were from
the way back. Monday, April 2, on I-75 crossing I-10 northbound.

I saw this billboard a few times and managed to snag a photo of it.

I know the intention is that it means "We're Nuts!", but I can't being
suspicious that this is a front for were-nuts, as in were-wolves,
were-bears. Vegetable Lycanthropes! What insidious monsters would
those be!

The interstates splitting on the south side of Atlanta. I'm taking
the I-285 bypass to the west. That interstate goes very near Atlanta
Hartsfield airport; in fact, the highway goes UNDER one of the
runways.

An airliner on very final approach.
This was a very pretty cloudscape just before I turned off of I-75 in Kentucky.

It's so well-defined, it almost looks like a Terry Gilliam animated
head-of-God should pop out of and start dispensing commandments.