Site Navigation:
Archives:- August 2016
- December 2015
- April 2015
- December 2014
- April 2014
- March 2014
- September 2013
- July 2013
- April 2013
- December 2012
- August 2012
- June 2012
- 2016
- 2015
- 2014
- 2013
- 2012
- 2011
Craig's twitter feed:
My blog server had pretty severe bit rot. I hadn't kept up with the site maintenance, I'm afraid. I don't know exactly what the problem is, but for at least this calendar year, I coudln't reboot the server without serious work to get it back running again. I think what probably happened is that something in the emulation layer got out of synch with something in the packaging, and so it just woudln't boot correctly. I got the great folks at my hosting site, vps.net to get the server running again a couple of weeks ago, and so I managed to pull a full backup, but then within the last week it died again.
Ove the past couple of days I backed up the backup, so I have everything from the old server image in multiple places. Last night and this morning, I bit the bullet and had the server completely re-installed. Now I've re-installed everything from the blog. If this entry shows up (It will be the first August 1, 2016 entry) then we know it worked.
When doing stuff like that, you discover all your sins in the installation. Like the fact that the blog is all packed into /var/www like it should be, but some of the support script are in a directory in my home directory. Ooops. And the includes are scattered around in wierd places.
More on that in a while. The house is fine, the cats are fine, the plane is fine. The family is fine, and has had another (human) member added to it, which is very exciting.
All for now. This has been a systems test; please ignore. If this were an actual blog post, I'd have a picture of an airplane instrument panel or some electronics or some such.
Photos that amuse me. I was driving somewhere and messing with the
Stratus with ForeFlight.
At the Cabin over Christmas. Burning paper trash here. I just liked
the shot of the burn barrel and the creek.

It's been a hell of a year. As of October, all of the settings of the Back to the Future movies are now in the past. Our "Log In Date" for our adoption portfolio was mid-November, so that's exciting. We're taking Mandarin Chineese (mostly spoken, some written).
Aaaaaaand my father-in-law died a couple of weeks ago. :-( Thus we ended up here longer than expected, and we had (and still have) lots to do. Oy. An ugly transition. Very sad. We're still getting used to it.
So I'm going to try to get posts up that summarize the interesting bits of the year. Here's the one for this trip.
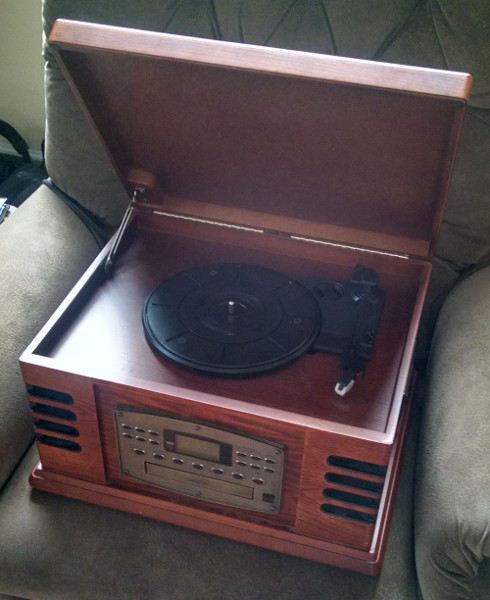
One interesting thing: my wife and I gave this record/CD/tape
player/radio to my father-in-law in...it must have been 2002. I tried
to play a CD in it, and the drive is jammed. Apparently he used it so
much that he wore out the drive mechanism. I'm incredibly gratified.
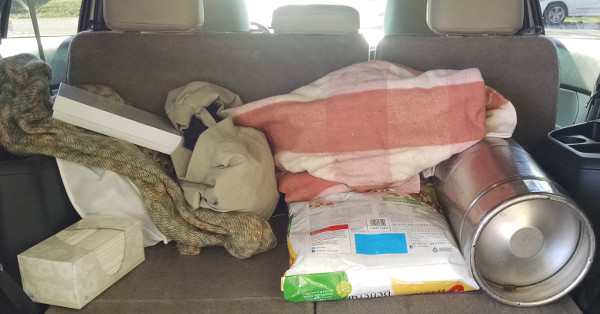
This is the back of the Explorer about to head back from the memorial
service. The cylinder on the right is a 1/6th keg of beer, so that we
wouldn't run out when all the people came back to the house. We
swapped it in before the night was over. People got a kick out of my
walking across the road to the liquor store and bringing the keg back
with my funeral clothes on.
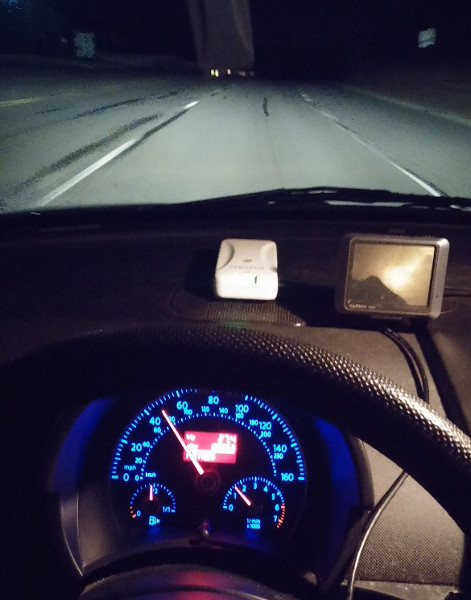
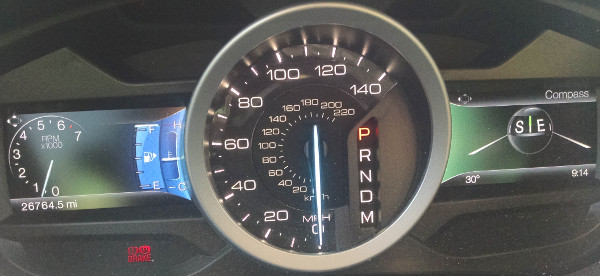
And I got some Taurus driving in while running errands; some day driving
and some night driving:
And I got to drive the Explorer a bit. It's fairly new one, so it has
the fancy digital dash.
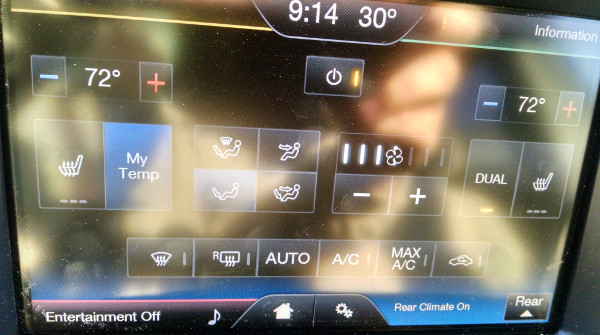
And the climate controls are complicated enough to launch a space ship.
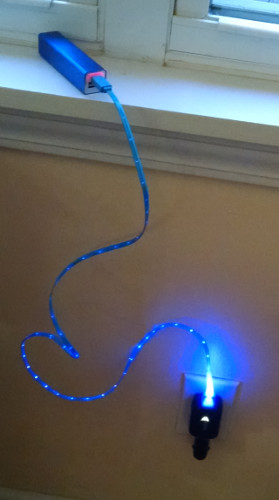
Charging back-up cell phone batteries. The cable is obviously better
because it has glowy lights in it. :-D The charger is one of the a
great set of Sprint chargers that are both car chargers and wall
chargers, and they have lights on them.
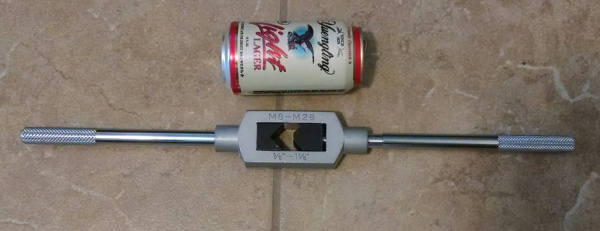
My Christmas present to my self is this comically large tap handle. I
got this because I'm going to tap the engine block of my VW for an oil
filter, and the tap is large enough that it doesn't fit in a normal
tap handle. The beer can is for scale.

I was sitting on the couch studying for my Chinese language final.
This photo is absolutely not posed; Jasper came, sat down with me, and
put the royal paw on my books. I think it's a hilarious pose; it's
great that he looks so stern.
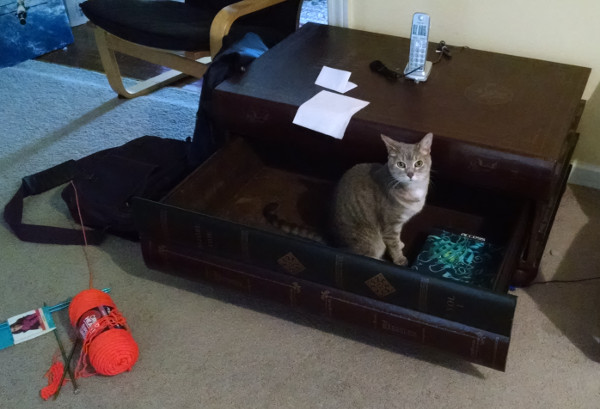
I've had a long-term project around the main floor of the house to
kind of get my stuff organized in a longer-term way. I like having a
working desk that I pile stuff on to work on or sort, but of course
that gets piled up. So I cleared out this drawer, so it can be the
"to be sorted" or "to be gone through" piles, so it's out of the way.
Of course, as is no surprise, Pangur is helping.
All for now. More entries on the year as I get photos edited.
I meant to come and have the annual of the plane take 3 or perhaps 4 days. *sigh* It's not super-bad, I get to stay and play with the parents-in-law who are awesome, but it's been two weeks as of tomorrow and I miss my wife and cats.
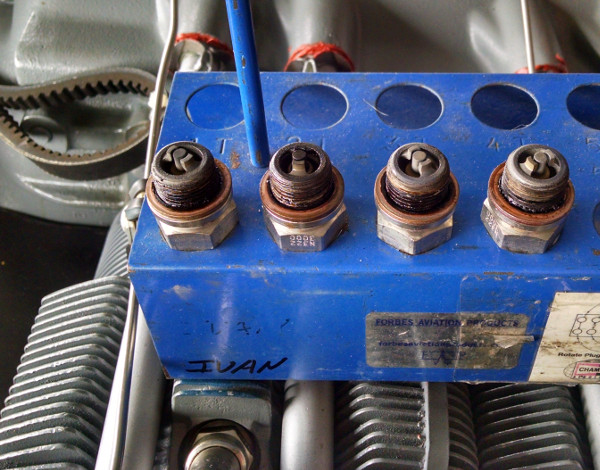
This post is about what I've been doing. Early on we cleaned and check
spark plugs; everything looking healthy there.
One of the big things I've done this trip is take all the belly panels
off my plane for the first time. Here they are laid out with piles of
screws.
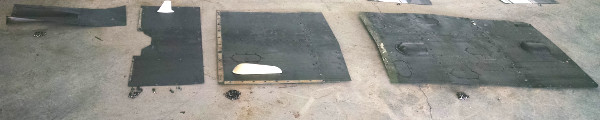
I forgot to put something in the picture to scale; the panels
are about 2 feed wide, top to bottom in the image. There's about a
few hundred screws holding them to the airplane.
Getting the screws out wasn't trivial. Three of them had actually
completely frozen, so I had to cut a slot in their heads with a dremel tool to
get them out.
Another thing I got to mess with was taking off and putting on the
spinner.
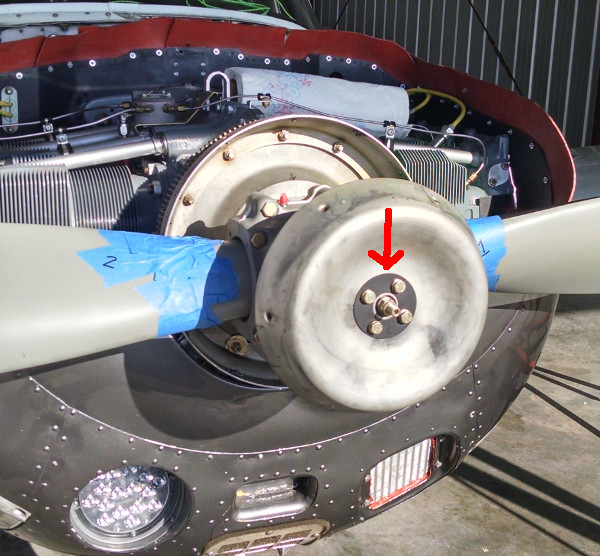
I painted the pressure plate (highlighted by the red
arrow), and then installed the forward bulkhead with new screws. Just
waiting for the mechanic's approval to put that part back together.
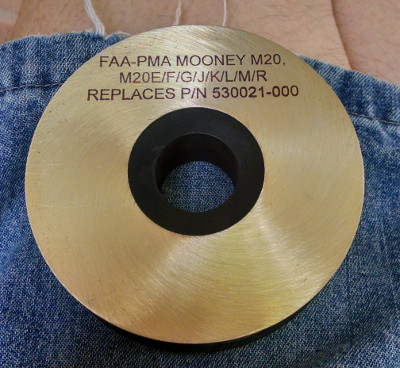
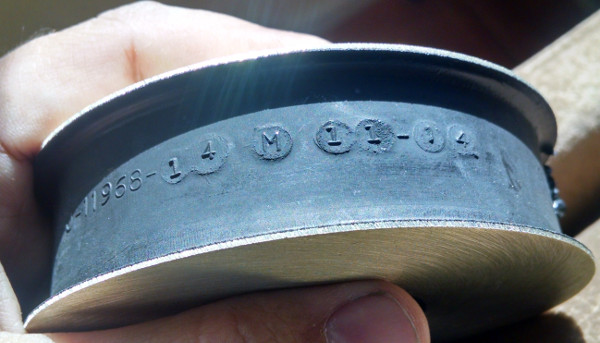
So what's the fuss about? Why did I stay longer? Well, I needed to
have a spacing collar installed in the nose gear for better handling.
THe collar is the silver ring; the white plate is the pressure plate
at the top of the gear doughnuts.
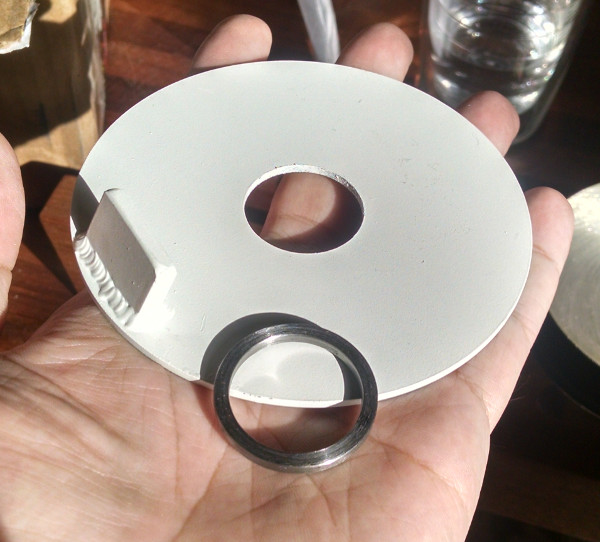
And as long as we're taking the nose disk shock tower apart, I decided
to have the shock disks in the nose gear replaced.
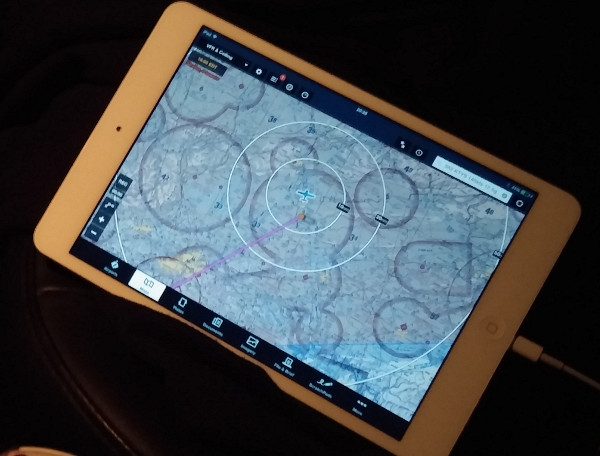
Also, while I've been driving back and forth to the hangar (1 h 20 min
each way) I've been testing chargers to see which one worked best
charging my iPad mini.

So tomorrow, hopefully by mid-day the nose gear will be back together and I can start planning for the trip home.
Here's what I've been doing with the Stratus. Here's my working
cardboard template that I'm getting into shape.
I'm basically making
a basket or tray that holds the stratus along the axis of the
airplane, so that I can see the status lights, and so that it doesn't
slide off into my lap from the glare shield. I did this very early in
the year.
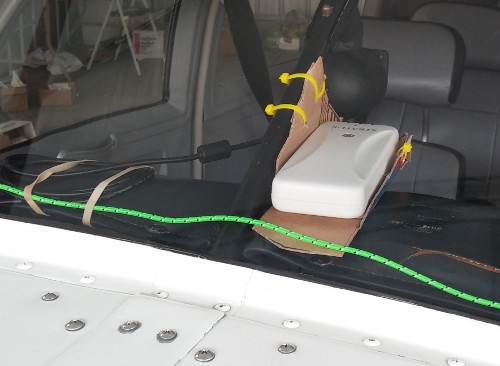
A few weeks later, I put together a more precise version of the tray.
Here I've put it together.
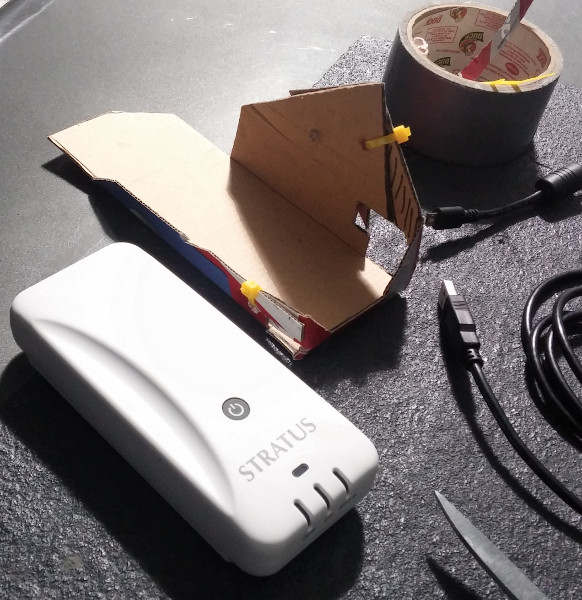
Eventually the thought is to make the tray
out of Aluminum so it's stiffer, but the cardboard will do for a
short-lived version.
The green cord is a USB power cord that runs along the top of the
glare shield and then comes over by the pilot to power the iPad.
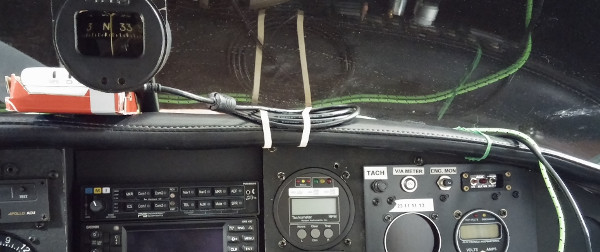
The cardboard tray, cable tied into place on the compass mounting
tube,
with the Stratus sitting in/on it. And the power cable to the
Stratus:
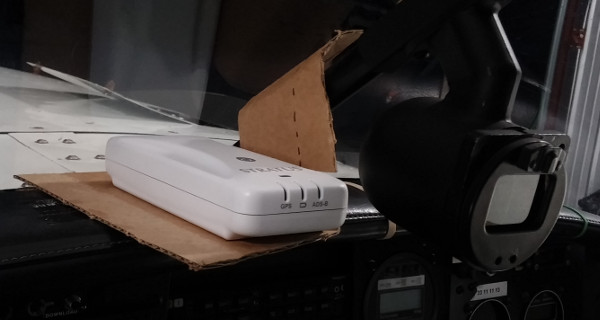
Here's what the setup looks like from outside the windshield:
If I park the airplane just right, I can get the car into the hangar
with the airplane still in it and shut the door:
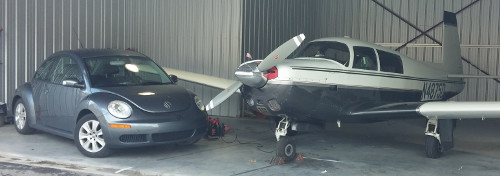
A closer view of the above shot. You can see the oil cooler nicely
here in the lower corner of the cowl. You can also see the Stratus in
its mount under the windshield.
And after a couple of hours of futzing and prepping, the airplane is
ready for its trip to Texas (another post).
The weather was likely to
be fairly cold the morning that we left; you can see the extension
cord going in the oil door on the cowl; it's attached to the engine
heater plug and comes from a timer on the other end. I set it to
start warming the oil several hours before we got to the hangar. It
worked great.
Last year sometime, I bought a charger to go in the airplane. It has
three outputs, with different current capacities marked on the
USB ports:
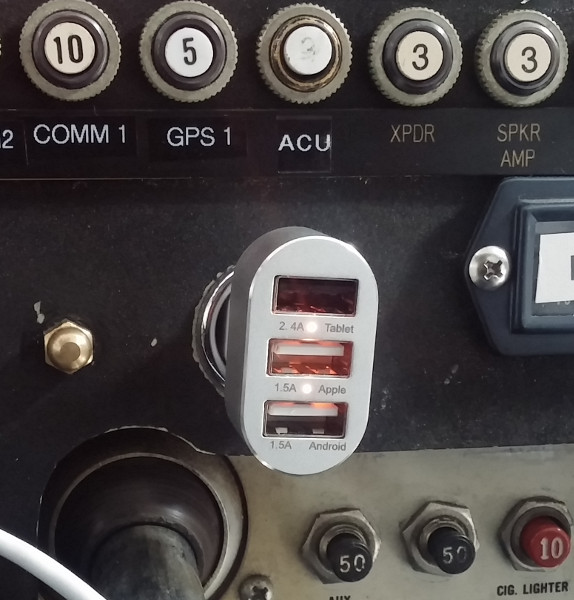
It worked pretty well for my accessory electronics in my airplane
while I was flying. The 2.4A output was enough to charge the Stratus
GPS/ADS-B unit, and the lower 1.5A output would charge my iPad.
Well, I got another one to charge the two devices, a newer one without
the labels, with the hopes that since all the outputs were the same,
it would be able to supply full output current to all three outputs.
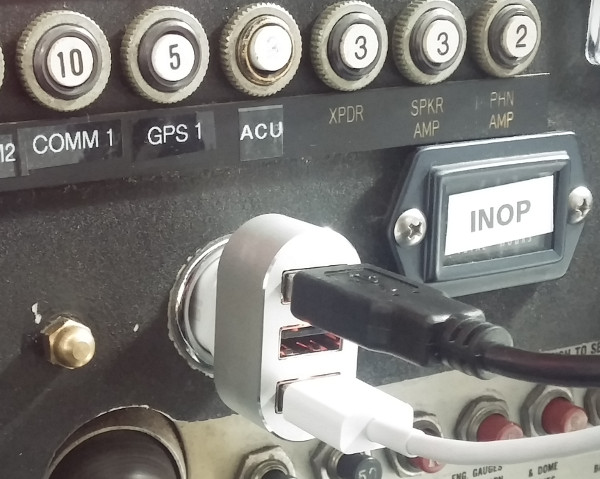
Not so much, it turns out. Only output that can charge the Stratus is
the top on, and the other ports act the same as the labelled one. So
in other words, the unlabelled one is the same as the labelled one
just without the physical labels. Oh well. More recently I've been
investigating other charging solutions. (Both of the 3-output white
chargers are "Bolse" brand.)
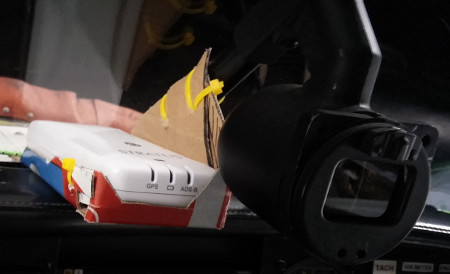
One interesting thing I ran into while testing the newer charger was
that if I pushed it into the power socket (formerly lighter socket)
all the way, it would trip the breaker. Looking inside, you can see
why:
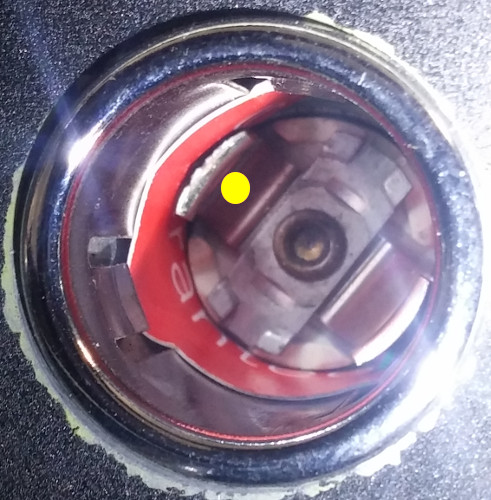
The yellow dot indicates the tang on the hot part of the socket. You
can see it's scored on the edge where it's touched the side. I
suspect that someone put the back part of the socket from a car into
the socket from the airplane. This is something I'll have to talk to
my mechanic at annual (which is soon). My temporary solution is the
red cardboard strip that keeps the tang from touching the grounding
barrel.
The reason that I'm getting the charging stuff set up is that I
bought an iPad mini 2 for my electronic charts.
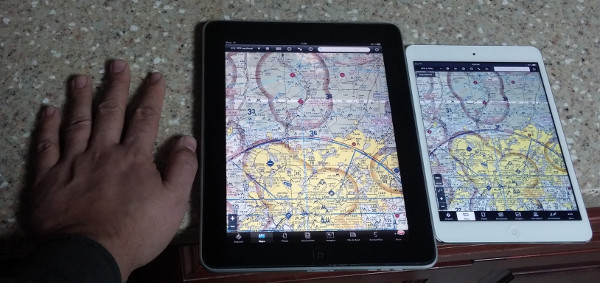
Next to my hand is my
old iPad 1 that I've had for a few years, and farther away from my
hand is the mini. Both are running foreflight here.
I have a RAM ball mount on the bottom of the pilot's yoke in my
airplane. I have a RAM mounting arm and an iPad mini mount to hold
the mini in front of the yoke. Here you see how I've modified the
arm, so that the arm will sit up flush with the yoke shaft:

And here's the iPad mini on its mount on the yoke. This is basically
my view sitting in the pilot's seat.
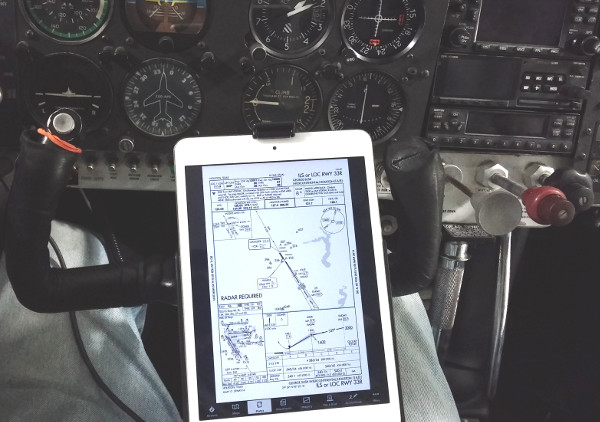
The full-size iPad is pretty
bulky, but the mini is perfect. I can read the approach plate (as
shown) but I can see the panel and switches just fine. I've flown
four big cross-country flights with it mounted this way, including a
real instrument approach in significant IFR conditions, and this
worked great.
Oh, and another thing: The Bolse charger wasn't able to charge the Stratus and the iPad mini continuously for all the flights. Sometime during the second flight, it stopped charging the stratus. I don't know if it gets too hot or what, but the flights were finished under battery power. Which is fine, but I wish I could get a solution that would continue to charge for arbitrary amounts of time.
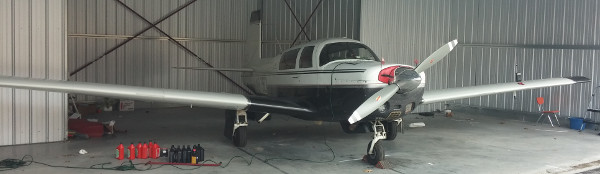
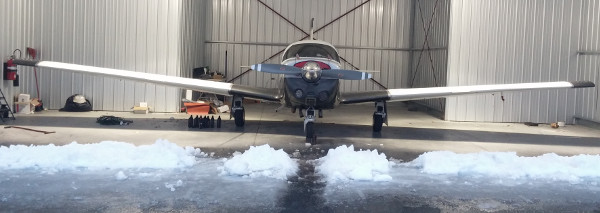
I realized the other day that I don't have any ANY photos of the
airplane in the last dozen or so blog posts, here here are a couple.
This was March 1 when I went out to the hangar and test the fit of the
iPad and test the charger. After two weeks of basically being snowed
in, we were able to get out of the house, but the hangars still had a
ridge of snow from it falling off the roof of the hangar building.
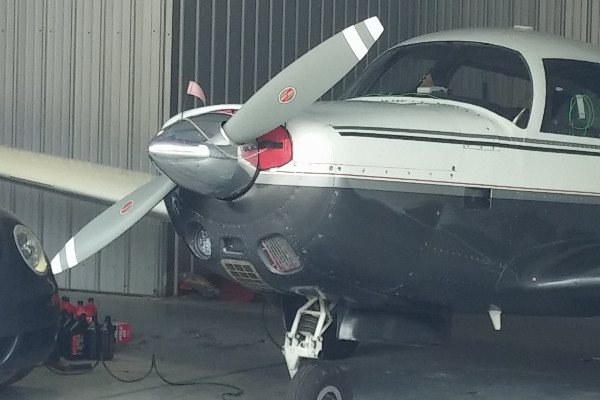
And just because it amuses me, a closer version of that same photo:
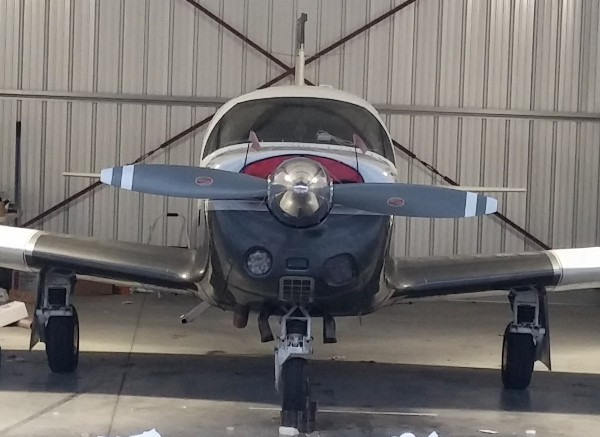
I love the asymmetric look of the nose, the landing light on the right
side and the oil cooler on the left. If you look closely, just to the
right (from our point of view) in the windshield is the Stratus taped
to the glare shield. The saga of the mounting technology for the
Stratus is another post entirely.
Wow--March was quite a month. Even in January, March was already shaping up to be a busy month. I had significant trips/commitments early in the month and late in the month. Then I had the bright idea to stick a really busy work trip with personal travel on both ends in the middle. So March was very busy with travel; as I write this on April 6, it's just finally settling out and this week should be back to a normal-ish schedule.
The first journey was a trip up to Cincinattii to help my wife run a conference. This was an absolute committment on my part, and has been on my schedule for at least six months. The two weeks of snowmageddon at the end of February were not encouraging for this trip. The conference was Friday/Saturday. Earlier in the week, the state of Kentucky wasn't doing too badly, but it was looking a lot of the state would get snow dumped on it on Wednesday and Thursday, so us just getting to the conference was looking iffy.
Given the snow that was expected to land on Thursday, if we started heading north on Thursday morning, it was likely we wouldn't be able to get out of town. So we decided to outmaneuver the weather. Wednesday afternoon (in fine weather) we drove to Lexington and stayed in a hotel right on the north side, next to the interstate, so the roads we would be driving on would have the best snow removal possible.
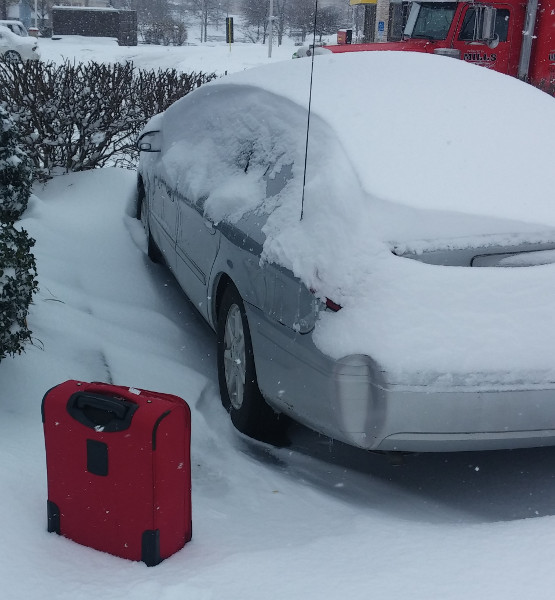
That worked fine. But we did get the expected snow over night. When
we got up, the car was caked with nigh on a foot of snow:
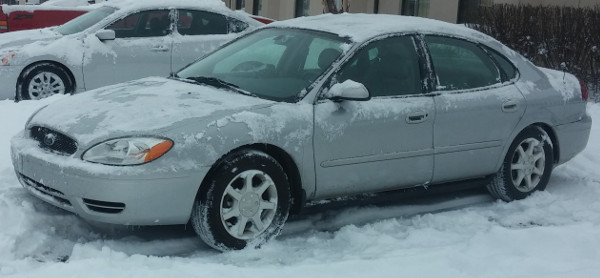
That morning, I did the first clear-start-scrape-defrost cycle
I've done in many many years. I know people in Minnesota do that
every day in parts of the winter, but it's been a while for me. I
also backed it across the parking lot so that it was clear of the snow
piles around it. The end result was pretty good:
While we were having breakfast I made some poor attempts at bird
photography while we were having lunch.


Due to the higgledy-piggledy of the snow and its effect on the
conference schedule, the conference days itself were super-busy, so I
really don't have anything to show. One really nice thing: right
across the street from the hotel was a Joe's Crab Shack:

I think if I were reviewing that as a design for an establishment in a
game, I would perhaps ask them to pull back the character a bit.
And last thing: on the way home, I saw this advertisement in a truck stop bathroom. It got me thinking more about car (and also airplane) USB chargers, which is another topic that I've been working on this past month.
So the trip to Cincinatti was the opening salvo of the month. The big trip in the middle of the month was yet to come.
The fall has been good, but busy. Work is good, the fall conference went really well. There have been a couple of changes, so I don't have photo editing and uploading sorted out yet, so this post is text-only.
The plane is doing superbly well. I took two signifnicant trips in it, in October and November, and absolutely NOTHING went wrong. This was a first. So I'm beginning to trust it much more for trips and such. The one last thing I want to do for this winter is to install an engine heater, so that I can electrically pre-heat the engine when it's cold. That will make life easier on it.
I didn't work on my old Beetle at all this fall, but I've started doing that again recently. I'd like to get it back in commission in the spring. I'm going to rebuild the engine, and now I'm working on assessing exactly what parts I need. The crankshaft is reground and I have new bearings. I was convinced recently that I probably really do need a new camshaft, so in the last week I've been working on assessing what exactly I need. I'll have another post on that soon.
I got a new phone early in the year. The way it mounts as a drive is different than older phones, so pulling photos off of it is different. You can easily pull images from folders that you've created, but it doesn't seem to want to pull images directly from the raw camera volume. That technique worked so well for so long; I don't get why that needed a whole new protocol. :-/
And *just* recently (Wednesday) we got new laptops. My wife was looking for one, and pinged me about a deal on Amazon. I liked it enough that I decided I wanted one too. They are Lenovo X140e Thinkpads. So I've gone away somewhat from ultraportables, but it's a relaly nice laptop, and not TOO heavy, with lots of battery life. I'm typing on it now. More keyboard throw and sound than I'm used to, but it's not bad.
More soon, but I at least wanted to get something up here.
I was planning on blogging every day in April. Ha. I got busy and went to the MAPA convention and got delayed (again) until I could fly the plane back and I've just been busy. I should stop promising to do that.
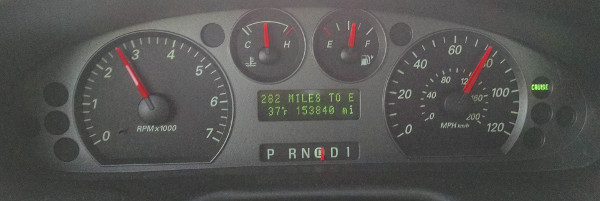
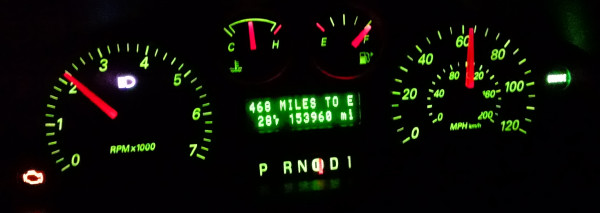
Anyway, the airplane is physically flyable, annualed (so it's legal to fly) and back home. Yay! Here are a few photos of the gauges while flying back the last leg from Bowling Green.
Here's the stock 6-pack engine cluster.
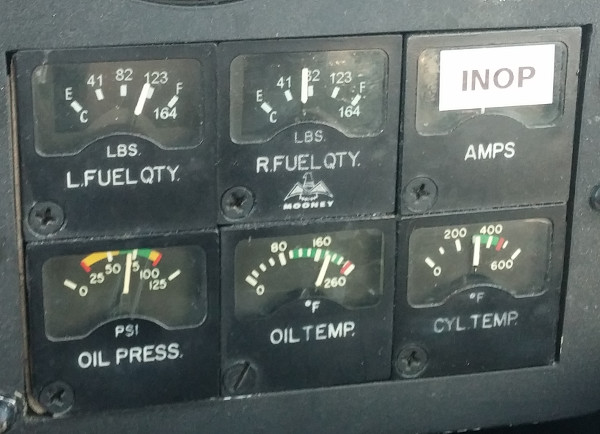
The upper right gauge, the old
ammeter, has been replaced by a new digital one (see next photo) and
so it's marked INOPerative. The important thing here is the bottom
three gauges are all firmly in the green (actually, the cylinder head
temp, the lower right one, is basically below; this plane cools
superbly well at cruise).
And here's upper-right side of the instrument panel:
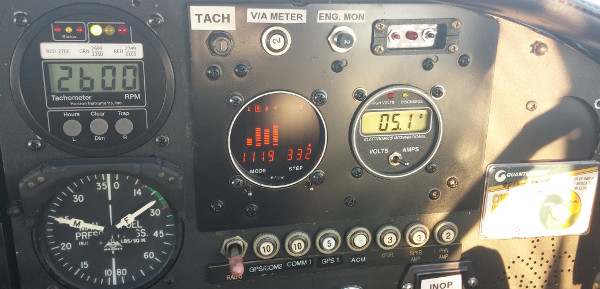
In the lower left is the stock manifold pressure gauge and fuel
pressure gauge. In the upper left is the new Horizon Tachometer. I
really like how it looks and how it works. The area in the center was
a blank panel up to this winter's annual. The orange engine meter
(bar graph thing in the center) was all the way over on the right
where the blank round panel now is. I moved it closer so it's easy
for the pilot to see it and get at the switches. The third meter, the
one with the single switch right below it, is my new
volmeter/ammeter. I got it because the stock ammeter just didn't read
very well.
The area in the center that's shinier black is a panel that I fabricated. The engine monitor is an older electronics piece, so it's fairly long and kind of heavy. THe extra screws that you see in the panel are attaching reinforcing rails to the back of the panel. Two of the breakers are for the new instruments. The third is for the engine monitor; it had been protected with an in-line fuse from the avioincs panel, but I wanted it on all the time, so I instead put a breaker and now it's powered from the main bus. And in the upper right is the control/sense plane for the new ELT (emergency locator transmitter).
Since we decided to have the engine overhauled for our airplane after the prop strike, and the airplane was going to be up for annual anyway, I figured that was a good time to take care of all the stuff that needed to be worked on and that would take calendar time, since the time was incurred anyway.
One of the things I knew was up was the ELT batteries. Every civil airplane in the US (with certain limited exceptions) is required to have an "Emergency Locator Transmitter" (ELT) on board. This activates if there's a sudden shock (because of a crash) and transmits a signal so that search/rescuers can locate the plane by radio signal. The ELT is internally-powered by batteries. Modern ELTs are supposed to have a panel in view of the pilot that allows the pilot to turn it on or off, and indicates whether its transmitting. In any case, I knew that the batteries in the ELT were due for replacing this annual anyway.
My plane didn't have an ELT panel, so I'd been thinking about that. So when I was at Oshkosh last year, I bought a used ELT (very cheap) with a new install kit. First, I thought that it would be interesting to look inside and see how they worked. Second, I though perhaps that the install kit would allow me to put a panel in properly.
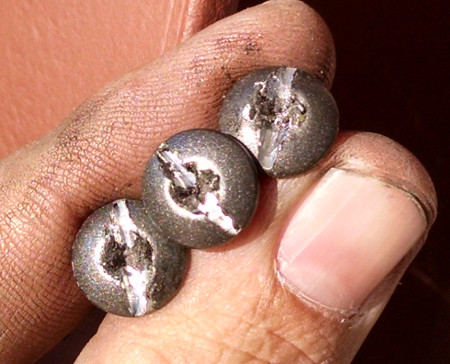
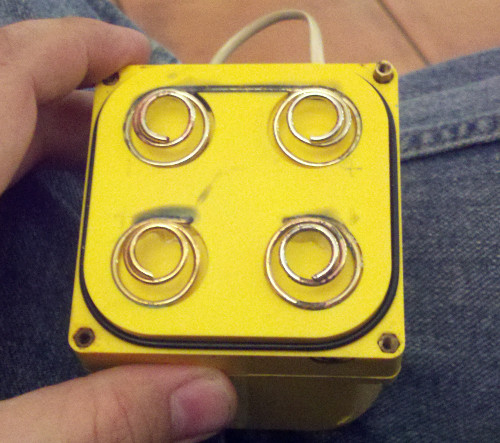
So, first step was to look at the old ELT and replace the batteries. It turns out that there were problems with the old one; it had broken mounting. Its batteries were also the style that had to be replaced by a specialized battery pack, not with off-the-shelf batteries.
So I asked my mechanic if we could just use the used one that I'd bought, which, as it turns out, can be batteried with Duracell D-cell batteries. He said it was fine to do that, as long as it tests out correctly. The one thing I needed to do was to clean off the battery terminals. At some point someone had left batteries in it too long, and the terminals were a little green.
So here are the battery terminals, nice and cleaned up and shiny:
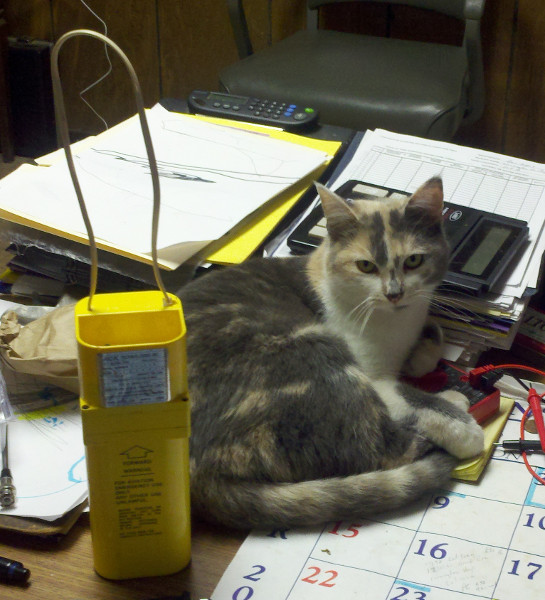
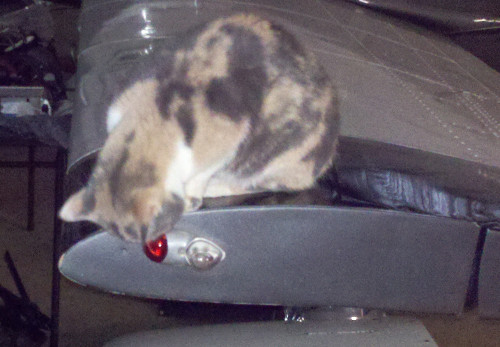
Here's the ELT sitting on the desk, batteries in and tested. The cord
is plugged back into the ELT itself to act as an emergency carry
strap. Patches the airport cat looks on.
Here's Patches inspecting the left wing navigation light.
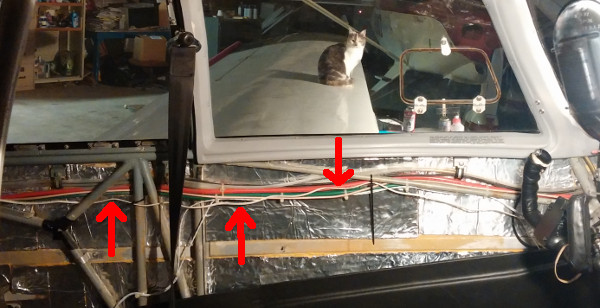
One thing I had to do was run the control cable from the back of the
airplane where the ELT sits to the control panel, which I installed in
the front instrument panel. Here's the left side of the body, with
the interior mostly out, with the cable (which is really a phone wall
cable) installed and indicated with red arrows.
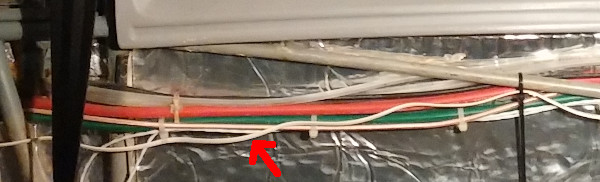
And here's a close-up of the center section:
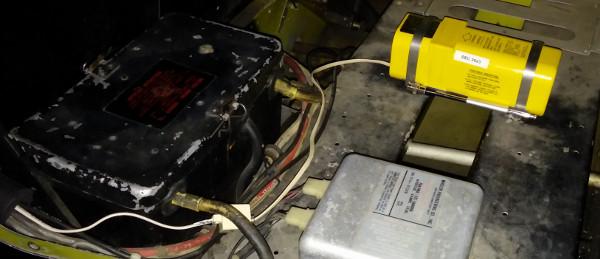
And finally, the ELT installed and ready to go, with the cable plugged
in and the unit tested.
Every since I bought my airplane, I've wondered how the avionics switches were wired in. There are three electrical busses that are original to the aircraft, and then an avionics bus. There are two switches to turn on the avionics bus; the main one in front of the pilot, and an auxiliary one on the other side, next to the avionics breakers.
Durin gone of my checkout flights, my instructor and I were flying and wondering about debugging another problem. I had the main avionics breaker on, and we wondered about auxiliary, so we turned it on as well. A couple of seconds later, it turned off (it's a breaker-switch). We didn't know why it did that, so we left it alone. I've never touched it in the air, but I've turned it on on the ground a couple of times.
But ever since then, I've wondered how it IS wired, and why it behaved the way it did. Generally if you turn on two switches in parallel, they'll each carry less current and so be LESS likely to trip.
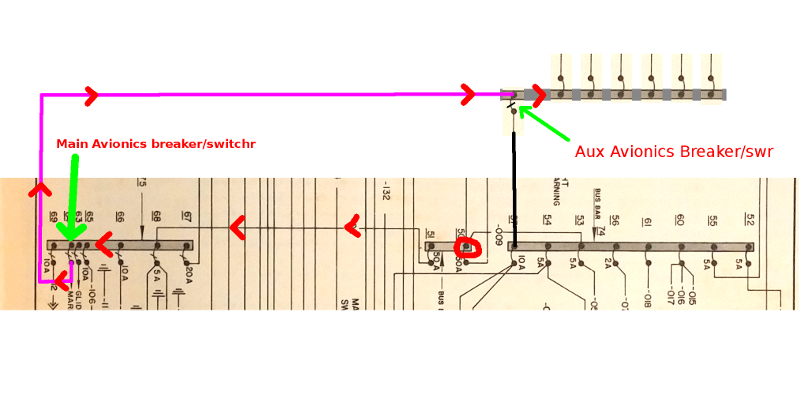
However, I think I've figured it out. Here are a series of partial electrical system diagrams. I cut out the bit of the diagram from the origianl maintenance manual for the airplane. There are three busses. The bus on the right is the "main" bus, and that feeds all the loads that are always connected. It feeds the electrical turn coordinator, and the interior lights, the lighter socket, and so on.
The bus on the left is the "auxiliary" bus, which has all the stuff that the pilot turns on and off. Landing light, navigation lights, strobes, rotating beacon, heated pitot tube, electric fuel pump and that's where my primary avionics bus switch is. The bus in the middle is called the "power" bus. It connects to the battery, to the generator, and then feeds the other two busses. In both cases below, I've circled in red the tie point where the battery and generator connect to the power bus. It's not important except that's where the current comes FROM in all cases.
One of the breaker switches on the left bus feeds the magenta (purple-ish) wire that then feeds the avionics bus up on top. The black wire on the left goes from the main bus, through a separate breaker switch (the avionics aux) and then to the avionics bus.
First, here's how current flows to the avionics bus normally. The
main avionics switch (on the left bus) is turned on, the aux avionics
switch is turned off, so the black wire on the right doesn't carry
current because it's disconnected. Current flows (marked with red
chevrons) from the power bus
through a wire to the left bus, then through the main avionics breaker
switch through the magenta wire to the avionics bus.
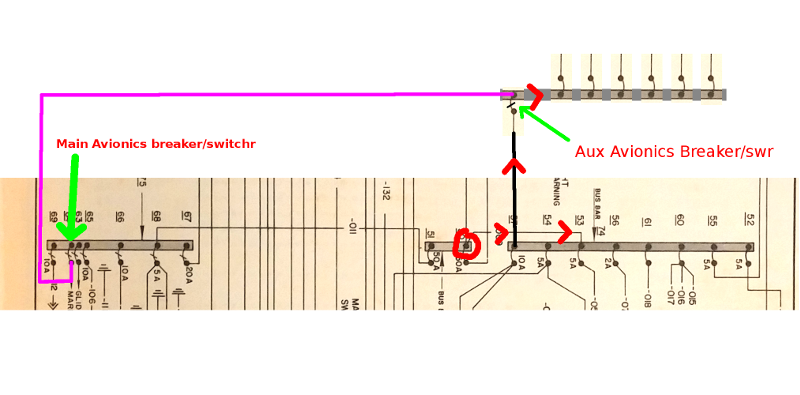
If the main avionics switch is turned off but the aux avionics switch
is turned on, here is the current flow instead. From the power bus to
the main bus up the black wire, through the aux avionics switch to the
avionics bus.
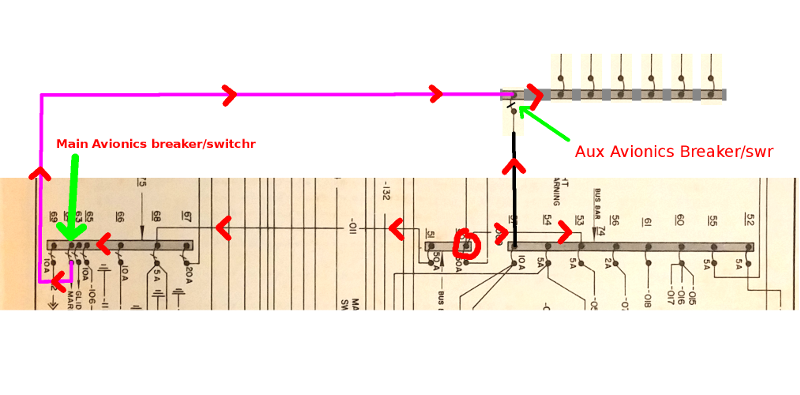
If BOTH avionics switches are turned on but there's nothing else in
the system consuming current, then the current flow looks like the
following. Some current flows through each breaker and along each
wire. Although I haven't tested it, I believe in this case that both
breaker/switches would stay turned on (wouldn't trip).
However, here it gets much more interesting. If, say, you had some
things on the left bus turned on. This would be consistent with my
circumstances when I was flying with my instructor; we were on a long
cross-country flight with some clouds, so I probably would have had
the nav lights and strobe lights on, at least. That's 10 or 12 amps
coming off the bus on the left. The current flow is something like
this:
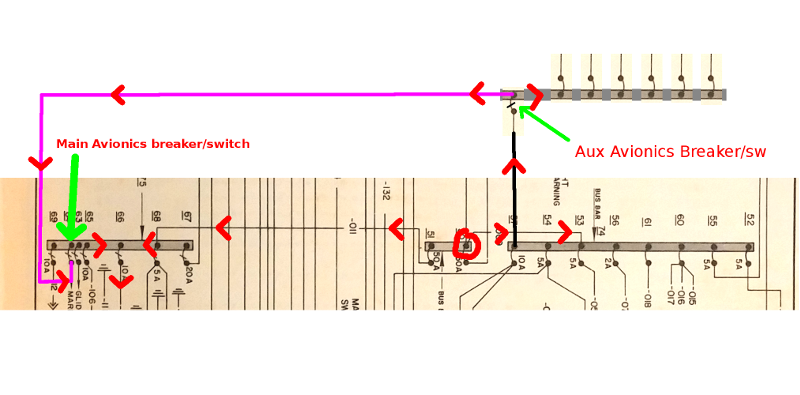
There are now TWO paths for the current to take to the left bus to
feed the lights that are on. One is the normal path from the power
bus to the aux (left) bus. However, current can also flow to the main
(right) bus, through the black wire, through the avionics aux
breaker/switch, then from the avionics bus through the magenta wire to
the aux (left) bus (opposite the normal direction of flow) and then to
the aux bus and then to the lights. How much current flows in each
branch is difficult to determine, and depends on the details of the
wires and connections, but no matter what, some current is flowing
through the aux avionics breaker switch that shouldn't be, and so its
current burden is higher than it ought to be.
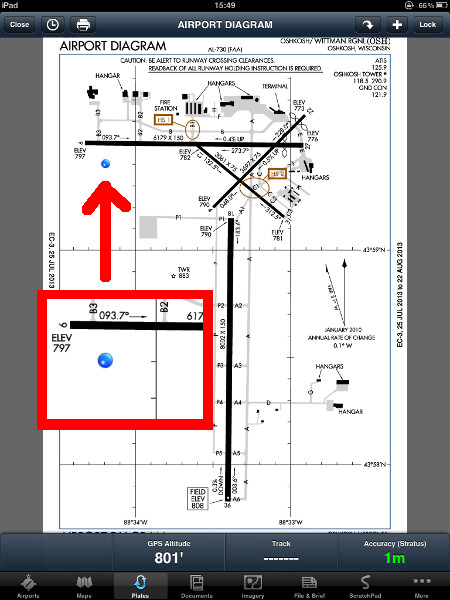
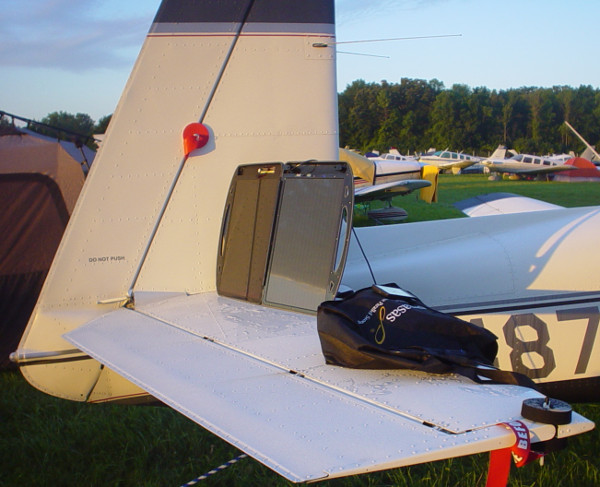
This entry is pictures of my camp site at Oshkosh and the charging implements that I brought along.
Here's where I camped, at the west end of the North 40. The position
is being indicated by he Stratus GPS.
The inital unloading:
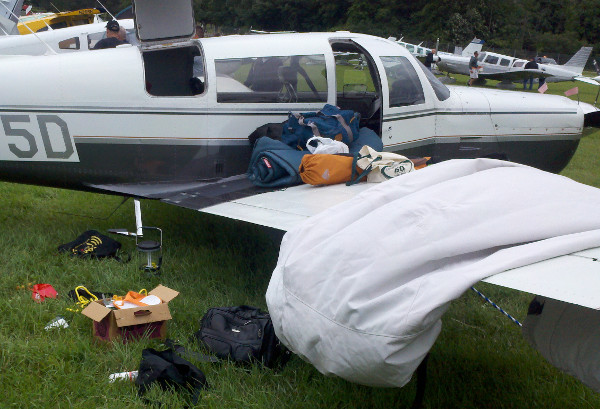
As a historical note, the weather at the time I landed was ASS cold.
Something like 43 degrees F and windy. And I didn't have anything
with long sleeves, because Oshkosh tends to be hot or humid in the
summer. While I was unloading and pitching the tend, I wore my
headset. I looked like a big-ol dork but at least my ears were warm.
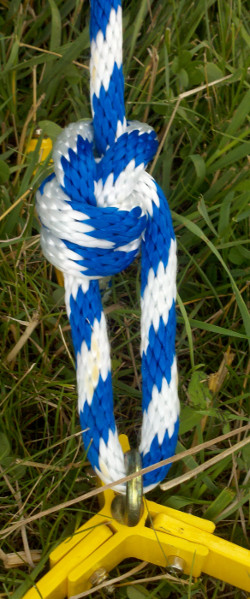
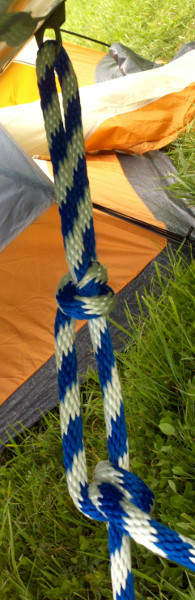
I tied the plane down to "The Claw" anchors.
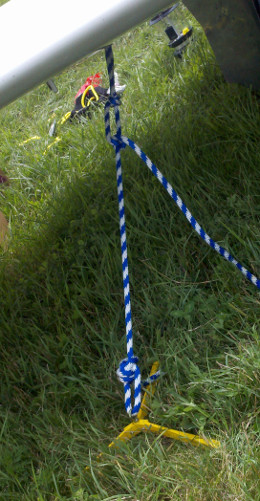
The knot securin the rope to the anchor is a double-bowline.
The top of the rope is tied to the plane's tie-down loops with two
double locking half-hitches.
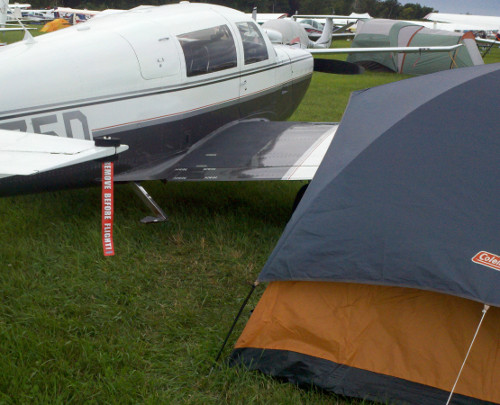
I pitched the tend behind the right wing facing the fuselage
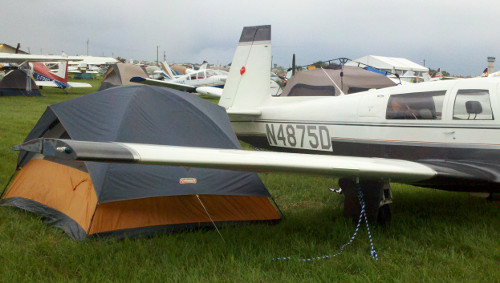
as close to the wing as I could make it.
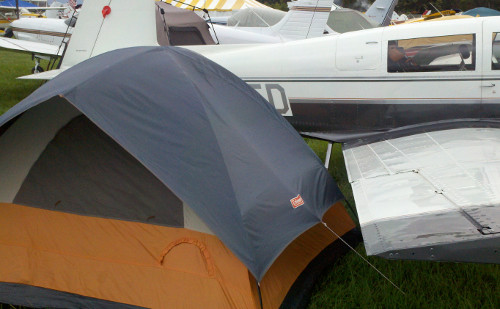
That way, I could step out of the tend and be at the luggage door in
about two steps, which was nice.

My walkway in and out was between the horizontal stabilizer and the
tent, which isn't ideal, but it worked, and kept the whole camp site
fairly compact.
I realized I was going to be mostly away from plug-in electricity, with my phone and laptop and camera. In the past, I've brought a big battery pack to charge things from. Those dont' last very long, though. So this year I stopped by Harbor Freight and bought a brief-case size fold-out solar panel, with fittings so that I can connect it to car chargers to charge my gear.
Here's the briefcase solar panel sitting on the tail catching the
morning sun:
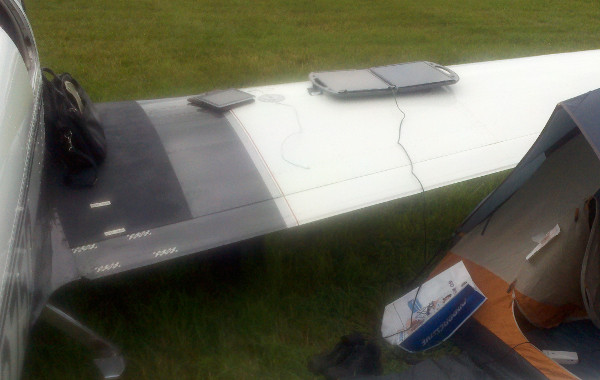
On the wing getting the mid-day sun
And then on the windshield to catch the late afternoon sun
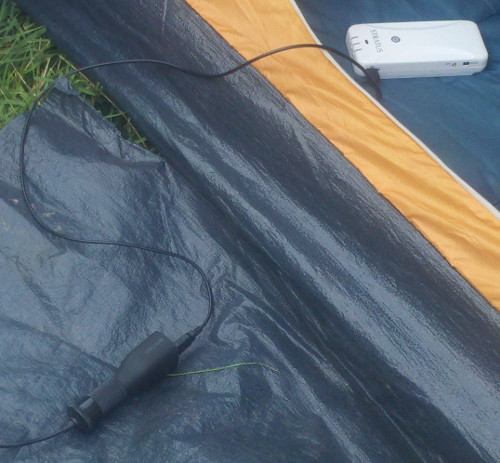
The solar panel has a cable attached to it, that comes in the lower
right to the plug at the bottom center:
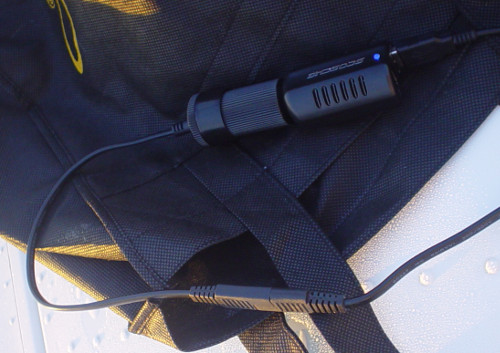
The it plugs into a car-charger-type socket (top center). Then
there's a car charger at the top center (with the blue light), into
which is plugged a usb cable which then charges a device.
Here's another charger charging the Stratus unit:
There are charging stations around; there's a big one at the North 40
shower house. Here's someone who has a battery back like I had who
had plugged them there:
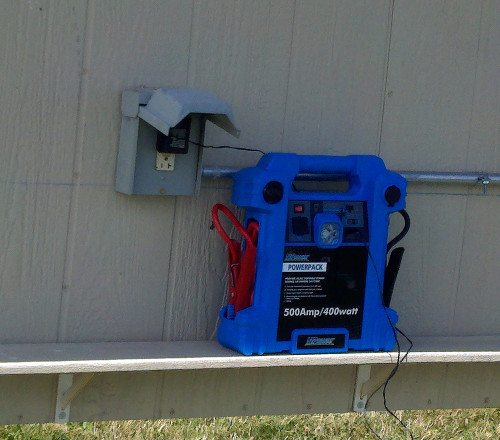
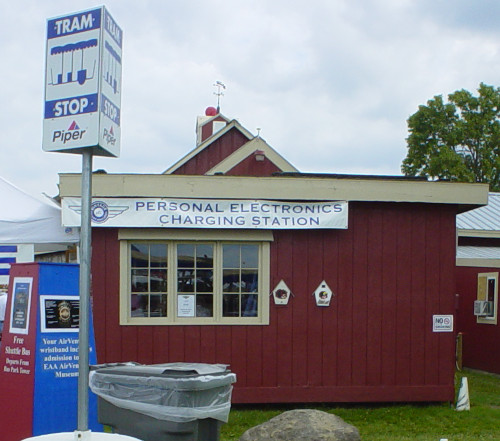
EAA had other places around the grounds for this function too:
Honda combined this concept with advertising both for themselves and
their generators by putting stations like this around the grounds:
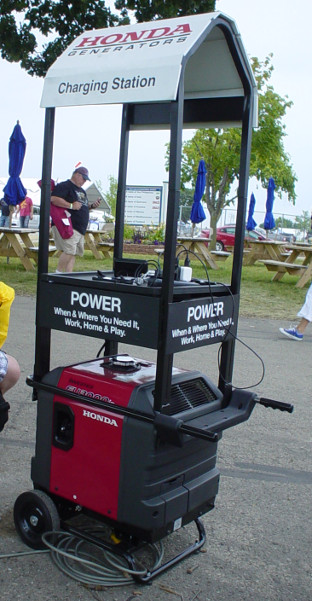
This is a running generator with a couple of power strips on a little
platform. It also had several chargers and cables already. I
plugged in and charged my phone at one of these a couple of time.
This station was right by the food court, and it was well-used.
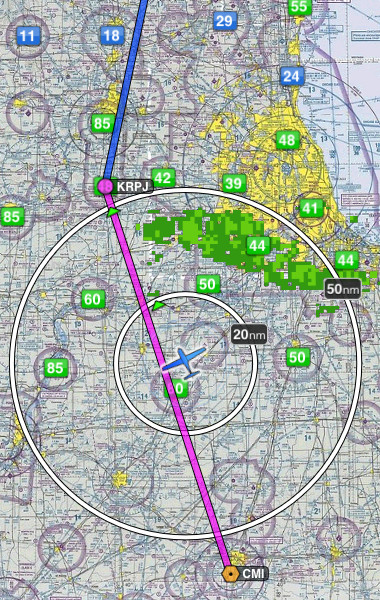
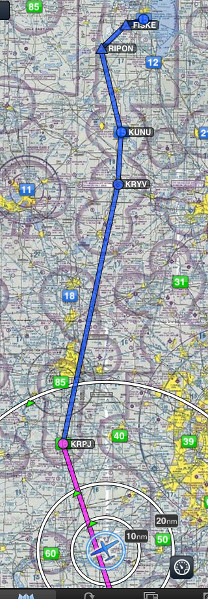
Ok, finally time to depart to Oshkosh. Early Sunday morning. Here's
the end of the route:
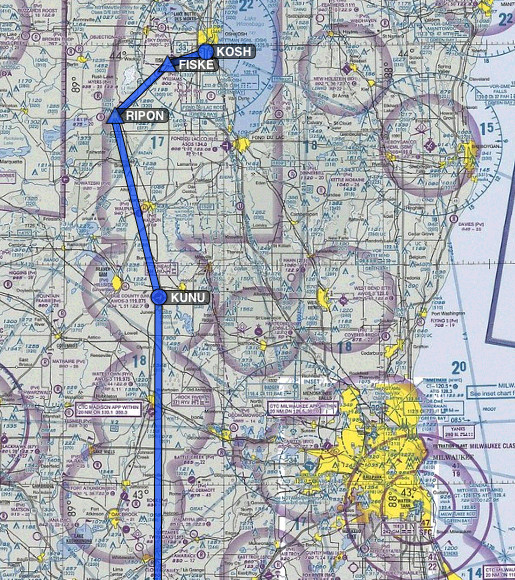
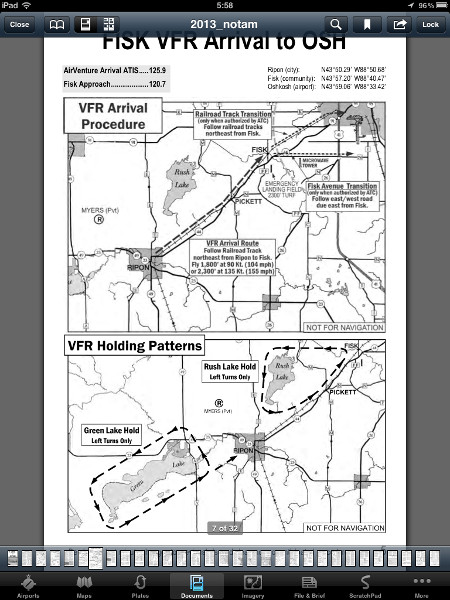
North through Illinois, then curve west to fly to the city of Ripon to
start the VFR arrival procedure. By the way, it was GREAT to have the
NOTAM stored in the documents folder in Foreflight.
Once under way, I realized I was going to tangle with a bit of
weather.
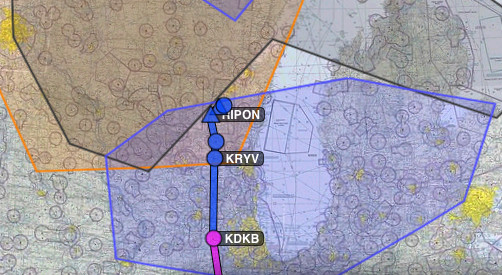
The colored blocks are AIRMETs, which are areas of meteorological
warnings. The grey one is IFR.
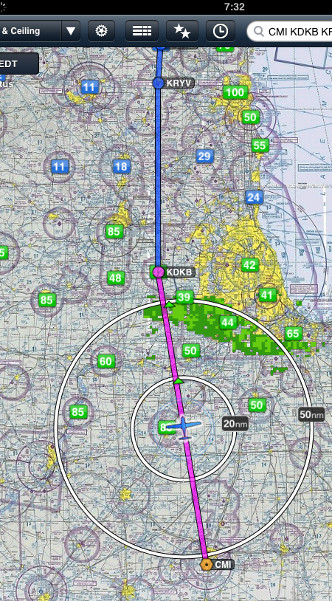
I also realized my course was going to cross throguh some rain, so I
diverted a bit farther west.
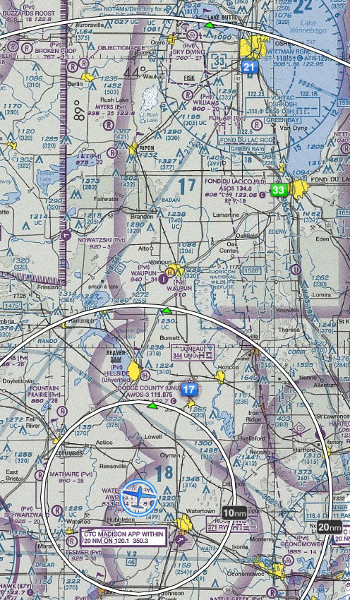
Having diverted around the precip, I was noticing that the ceilings
(green and blue boxes) ahead of me were getting pretty low, so I
stopped and took a look at things at Rockford, Illinois.
I waited an hour and a half, at which point the weather seemed to be
getting better rather than worse, so I headed out again. Things were
mostly better, so I continued on into Oshkosh.
I don't have any photos of the last part of the flight; I was a single pilot, doing it for the first time, and so I was kinda busy. I hope someday I can have a movie camera in the plane taking footage when I go.
My Mooney (airplane) is pretty well-equipped. I have reasonably sophisticated GPS guidance (although no autopilot) and I can fly all the same approaches that all but the very must well-equipped airliners can. I'm quite happy with the equipment list at the moment. Until yesterday, though, I didn't have any capability to receive weather while flying, which is a great tool for situational awareness and is becoming more commonplace.
I use a software product called ForeFlight on an iPad for all my charts and approaches. Their company has teamed up with Sporty's Pilot shop and a hardware manufacturer to make gadget called a "Stratus". It's a GPS receiver and it receives signals called ADS-B, which is a relatively new digital network that the FAA is rolling out that will eventually replace air traffice control radar. ADS-B signals are broadcast from the ground and contain information like weather radar.
The stratus module also creates a wireness internet hotspot that an iPad can connect to and access the GPS position data and the data stream that's coming in through ADS-B. What thsi means is that the ForeFlight app now knows where it is and also can overlay any information it gets from the ADS-B data stream, such as weather radar, right on the Foreflight chart displya. I believe it can also query things like current weather and forecasts from airports with weather reporting.
I flew up to the Sporty's store in Ohio yesterday to pick up a second-generation Stratus, which just came out recently. I managed to use it flying home, and I was very happy with its performance and how easy it was to get going and set up.
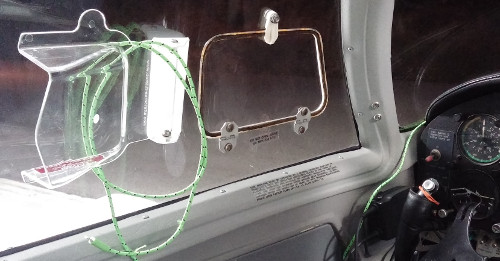
How nice of Mooney to put such a nice holder for the Stratus when
they put together the airplane in 1967!
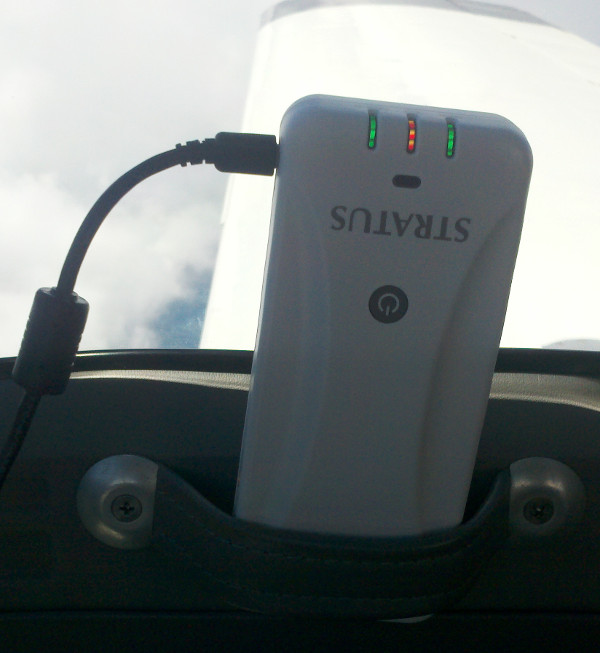
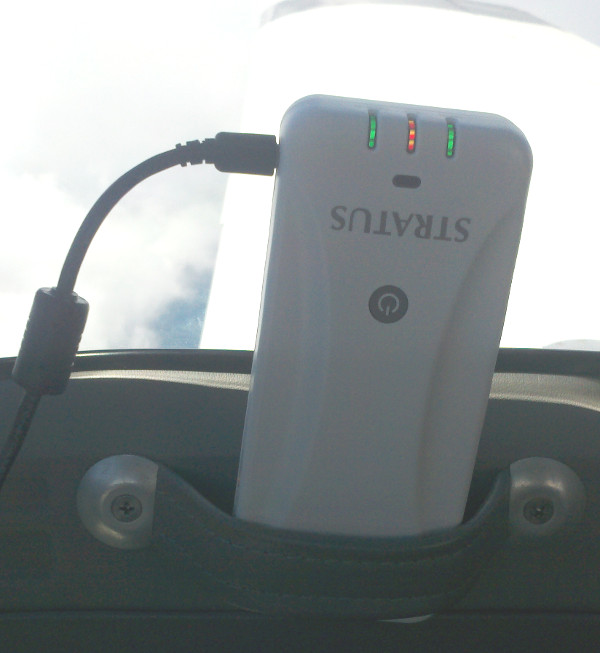
This is the pull handle on the passenger door on the right side. I
was flying home around noon, and the sun was from above and slightly
to the left, so by putting it there it kept it out of direct
sunlight.
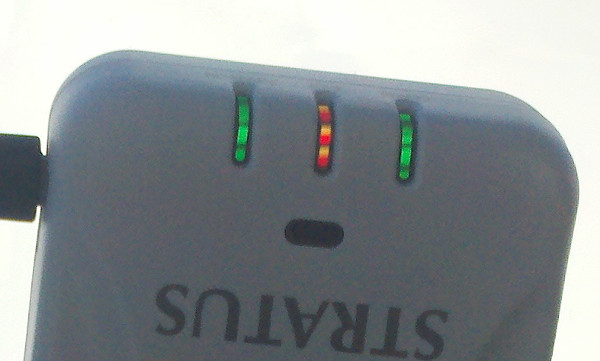
I think the interesting pattern that the camera digitization makes
with the lights is cool. The middle light doesn't look like that; I
guess it's flashing two different colors rapidly and the camera picks
then up as it scans down the image.
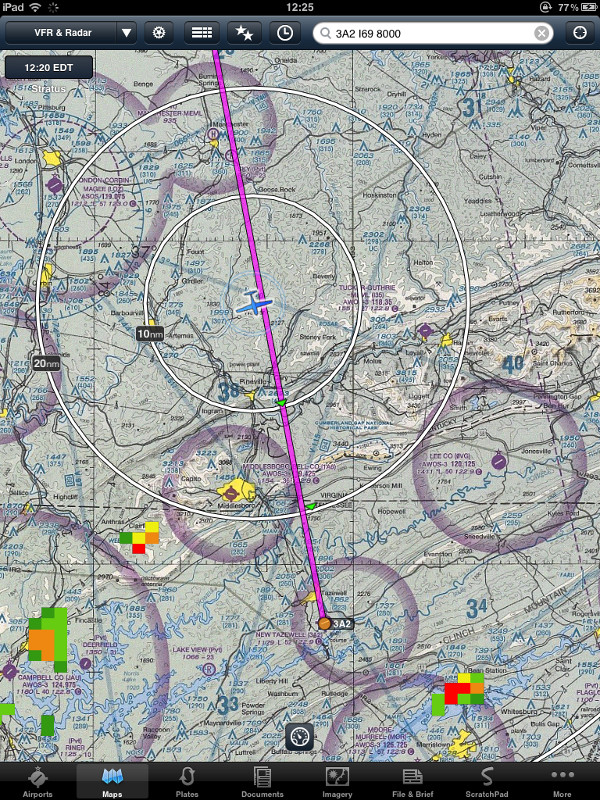
And once I had the proper thing turned on in the iPad, I got position
information and I could see that I wasn't going to run into any rain
in the last leg home. Nice.
I have to say, the corporate philosophy of this does bother me somewhat. I think generally it's a bad idea to buy a piece of hardware that's so closely tied to a single piece of software. However, ForeFlight is my electronic flight bag app of choice and it will likely be around for at least a few years. The Stratus is cheap enough (on the scale of aviation devices; it's less than a good Bose noise-cancelling heatset) that I'm willing to take the risk that it might only be good for a few years. The upgraded capability is worth it.
So my initial impression is that it's easy to use with Foreflight, does everything it's supposed to, and is absolutely worth it as a capability upgrade if you don't have on-board weather. I'll report back after I've used it in my flights to Oshkosh and back.
Busy spring, behind on blogging, etc etc. Things are looking up, though.
One quick really awesome thing that I did yesterday, and then a general status update. I airplane that we bought has an engine monitor and a data recorder, so it keeps track of engine temperatures while you fly. The resulting data gives a rought history of the flying history of the airplane. Until yesterday, I knew the data recorder was there, but I didn't know if it worked, or if it was recording data, or what.
I hooked it up and I pulled data out, which is intelligible. I haven't put together scripts to really analyze it yet, I was able to establish that it is recording data, the data seems reasonable. The data goes up to the present time. It goes back to the first flight I took in it about 238 days ago at the beginning of November 2012, and it goes back something like 5 years! This will be a treasure trove of historical information.
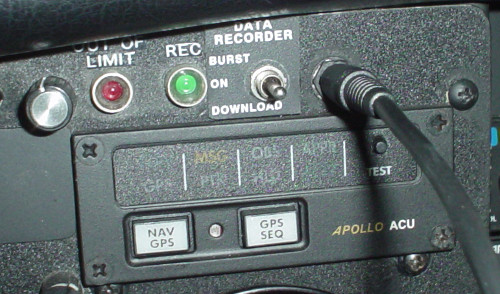
I'll cover more details of this in a future post, but the short story
is first I hooked up the data download cable that EI Engineering sent
me (for free) to the download port on the panel
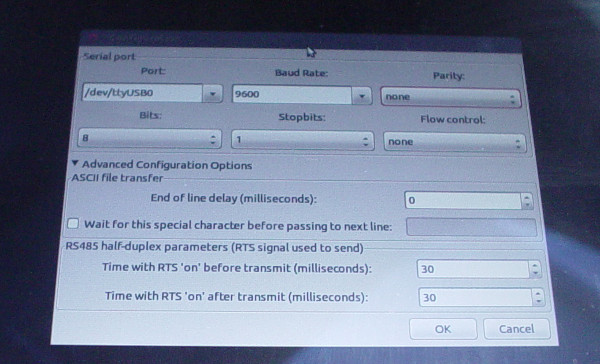
From that cable, went to a Belkin USB-serial converter

I figured up gkterm, attached it to the USB serial port /dev/ttyUSB0
and configured the baud rate, data bits, parity bits, stop bits (first
time I've done that in years)
Then I powered up the airplane's electrical system and turned on the
avionics, and immediately the serial port showed diagnostic
information and sensible looking numbers. Holy crap--it worked the
first time!
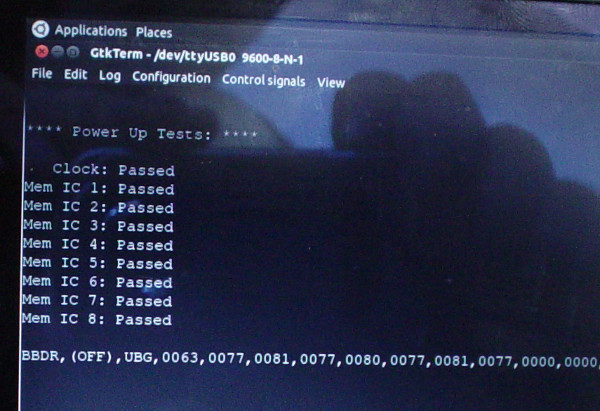
Like I said, more later, but I'm totally jazzed that this worked.
Lots of airplane news. The oil consumption problem was a bad ring on cylinder #2. Removed and replaced, oil consumption is way way down. I flew it almost 2 hours on Saturday, it's ready for cross-country flying. I think I figured out the problem we were having with the GPS. I don't think it was seated correctly in the tray, and I think it's better now. We'll have to see, but I'm going to cancel the appointment we had at the avionics shop.
I have a new fuel pump in the vintage beetle, so that's running. I still need to change the oil again to get the last of the gasoline out. I drove it around town; the suspension is still sloppy. I'm going to have to do a top-end rebuild. I'll try to work on that in August.
Draft number two of this post.
How big is data? Human minds often have trouble encompassing more than a few orders of magnitude at a time. When the amount of somethings goes from thousands to millions to billions, it's difficult to really keep the whole picture in your grasp. This is particularly true of the sizes of quantities of data, which vary by many orders of magnitude even within a single computing device.
I sat down one time a few years ago and tried to come up with an analogy for the difference between the largest and smallest useful units of data to the largest and smallest animals on the earth. Unfortunately, animals don't have nearly enough range of sizes to accomplish this. More recently, I realized I could use length as a proxy for data size and give a fairly good idea of how big things are.
The bottom of the scale is 8 kilobytes, or 8000 bytes. This picked for both historical and practical reasons. ENIAC, the first electronic digital computer, only had registers but didn't have anything like a "memory". However, its immediate successor did; the EDVAC had a memory of about 8k in the 1950s (it was a room-sized computer). The Apollo Guidance Computer (super-miniaturized computer built in the mid-1960s about the size of a small suitcase) had an erasable memory of 2000 15-bit words or about 4k. The level-1 cache of a single integer core of an AMD Interlagos processor is 16k. So across the 3, which covers, 50 years of computing hardware, 8k is a reasonable starting point for the smallest amount of data storage worth bothering with. In our length analogy, we'll make 8k equal to 1 inch, 2.5 cm, or about the width of a person's thumb at the first knuckle.
A high-density 3.5-inch floppy disk is 1.44 MB. The analagous length is 180 inches, or about the length of a mid-sized sedan.
A digital photo is usually 2 to 3 MB; the analogous length is about that of a bus or a truck.
A CD is 650 MB. The analogous length is about 81,000 inches, 6700 feet, or a mile and a quarter.
A DVD is 4.7 GB, analagous length is 588,000 inches, or 9.3 miles. It's about the length of Manhattan island; you can drive that in 10 minutes on a highway.
As of this writing, the middle size option of both the middle iPad Mini and iPhone is 32GB; this is also a fairly common size of SD card. The analagous length is 4 million inches, or 63 miles; about an hour's drive.
A reasonable hard drive in a new laptop is 250 GB. The analogous length is 31 million inches which is about 500 miles. That's the distance between Boston and Washington DC, or between London and Edinburgh; about what you can drive in a car in a very long day.
Around the biggest single hard drive that you can buy in a retail store today (as of early 2013) is 4 Terabytes. The analagous length is 500 million inches or 7900 miles, or about 1/3 of the circumference of the earth.
So the ratio of the sizes of the smallest useful amount of data and the largest reasonable single chunk of data is the same as the difference between the width of someone's thumb and 1/3 of the way around the earth. There you have it.
I'm a pack rat; this comes as no surprise to anyone who's ever been in my house or garage or office. I tend to collect things that I want to use later. Often the net effect is that I end up having to throw stuff out later, frequently enough if I want something I can fine the one I used to have and put it to work.
I'm like that with physical things and with data. I have data disks that I was using regularly almost 25 years ago. So this blog post by data preservationist Jason Scott about the end of floppies came as a bit of a rude shock. I'd been carrying lots of old floppies with stuff that I used to use, and it never occured to me that I wouldn't be able to just throw the disk in a machine and read it.
I read that post last fall, when it was more than a year old. That really scared me, so I've been sort of vaguely tryin to get set up to pull data off of disks since then. I had the setup ready about a month ago but since then I've been rather busy. Today my wife is in Knoxville and my plane is in Lexington and broken, so I had time to start seriously feeding floppies into the machine.
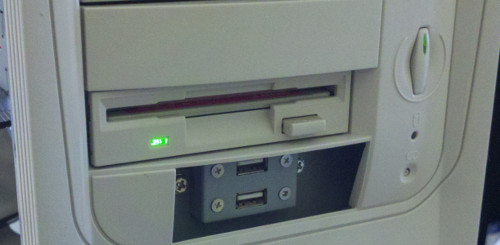
The results were actually pretty good. The 5 1/4 floppies actually did better; there were only a few that I couldn't get a full image from. The 3.5 disks didn't do as well, but I was able to get full images off of about 2/3 of them, and partial images off of several more. I have 10 or so that just don't want to read in the drive, so I may work harder on those, or I may not.
Most of what I'd like to preserve are game files, and I got at least one clean copy of all of those. The other thing is images. A lot of the photos that I took in graduate school were on floppies, because the camera that I used was a Sony Mavica that recorded onto floppies. I'm pleased that I pulled images from several of those disks, so I have images of stuff that I haven't seen in 10 years.
Feeding disks into the machine

read read read...

Here's me, much younger and thinner with more hair. This is on the
balcony of my last graduate school apartment. The laptop is the one
my group bought me. It's an original iBook. I lived in this
apartment August of 2000 to July of 2002.
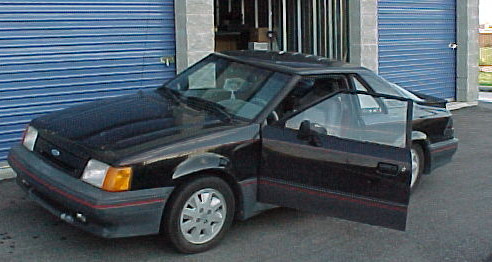
I didn't realize I had any photos of this car. This is my 1986 Ford
Escort EXP that I drove from the fall of 1996 to the spring of 2002.
Fantastic road car. It died the day that I interviewed for my
(current) job. It's parked in front of a storage unit. I'm about to
leave for the big summer run of my graduate school experient in the
spring of 2000.
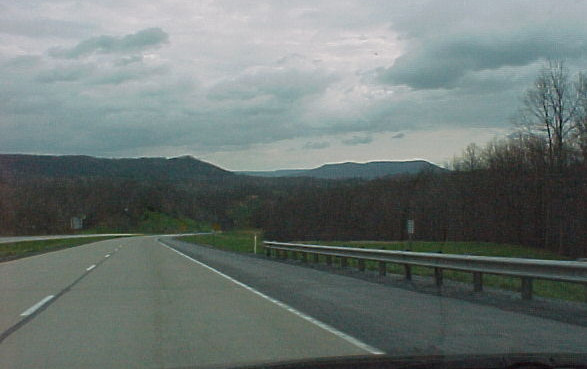
Apparently, even then I was prone to taking photos of the highway.
This is probably driving towards West Virginia.
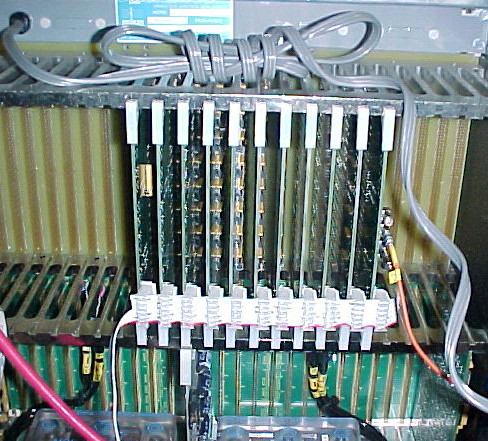
These 11 cards (and the corresponding ones in the other crate) were
what made my graduate school experiment possible. These cards
implement a wire-OR of the results of 352 comparators and put the
result out the orange cable on the right. My biggest worry between
1998 and 2000 was making sure that this piece of equipment did its
job.
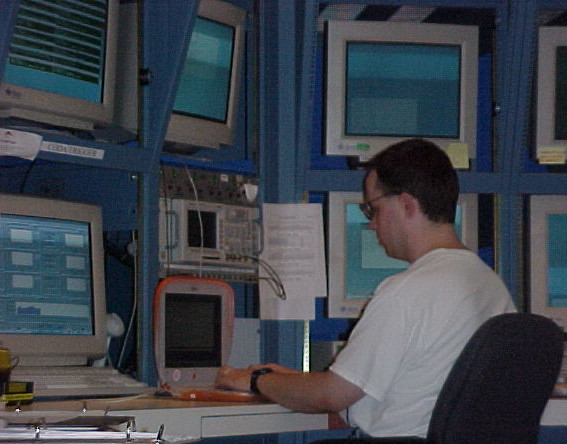
Here's me in the Hall B control room at Jefferson Lab sometime in the
summer of 2000. I find this photo terribly amusing; I'm doin stuff on
my laptop surrounded by larger and much more capable screens. So that
hasn't changed at least. :-)
This post is actually a draft. The real post will probably also be a separate page on the site. I'm putting it here to check to make sure the formatting is right and stuff.
How big is data? Human minds often have trouble encompassing more than a few orders of magnitude at a time. When the amount of somethings goes from thousands to millions to billions, it's difficult to really keep the whole picture in your grasp. This is particularly true of the sizes of quantities of data, which vary by many orders of magnitude even within a single computing device.
I sat down one time a few years ago and tried to come up with an analogy for the difference between the largest and smallest useful units of data to the largest and smallest animals on the earth. Unfortunately, animals don't have nearly enough range of sizes to accomplish this. More recently, I realized I could use length as a proxy for data size and give a fairly good idea of how big things are.
The bottom of the scale is 8 kilobytes, or 8000 bytes. This picked for both historical and practical reasons. ENIAC, the first electronic digital computer, only had registers but didn't have anything like a "memory". However, its immediate successor did; the EDVAC had a memory of about 8k in the 1950s (it was a room-sized computer). The Apollo Guidance Computer (super-miniaturized computer built in the mid-1960s about the size of a small suitcase) had an erasable memory of 2000 15-bit words or about 4k. The level-1 cache of a single integer core of an AMD Interlagos processor is 16k. So across the 3, which covers, 50 years of computing hardware, 8k is a reasonable starting point for the smallest amount of data storage worth bothering with. In our length analogy, we'll make 8k equal to 1 inch, 2.5 cm, or about the width of a person's thumb at the first knuckle.
A high-density 3.5-inch floppy disk is 1.44 MB. The analagous length is 180 inches, or about the length of a mid-sized sedan.
A digital photo is usually 2 to 3 MB; the analogous length is about that of a bus or a truck.
A CD is 650 MB. The analogous length is about 81,000 inches, 6700 feet, or just over a mile.
A DVD is 4.7 GB, analagous length is 588,000 inches, or 9.3 miles. It's about the length of Manhattan island.
A reasonable hard drive in a new laptop is 250 GB. The analogous length is 31 million inches which is about 500 miles. That's the distance between Boston and Washington DC, or between London and Edinburgh.
Around the biggest single hard drive that you can buy in a retail store today (as of early 2013) is 4 Terabytes. The analagous length is 500 million inches or 7900 miles, or about 1/3 of the circumference of the earth.
So the ratio of the sizes of the smallest useful amount of data and the largest reasonable single chunk of data is the same as the difference between the width of someone's thumb and 1/3 of the way around the earth. There you have it.
Getting my blog back up to speed has been on my to-do list for more than 3 years. As of tonight, it's done. All my blog entries from March of 2005 through the present are all here in one blog. The photos work, links work. Long live the blog, etc.
I started out using the blogger platform in 2005. It was (may still be) a great platform. I'd already established my own web site at craigsteffen.net, so I quickly figured out how to get blogger to generate entries and export them via auto-magic ftp to my own site. That arrangement worked fine until...I think it was late 2008.
I think it was that year that blogger announced that they were going to discontinue the external-ftp service. So I decided to set up a different blogging software. I looked over some of the packages available, and I decided that pivot was what I wanted to use. It stored its files as flat files on disk, but could be configured with menus and stuff.
I was able to pull most of my old blogger entries into pivot, sort of, but the images never quite worked right. And I discovered that I couldn't make pivot do categories of posts, which is one of the things that I really wanted to work. So after a short time, I decided that it would be easier to just write my own software rather than trying to get someone else's to do what I wanted.
So I've been working on a set of php and perl scripts in my free time for the past couple of years. The blog that you see here is the result. Up until the past few days, the last time I spent serious time working on it was a year and a half ago, the summer 2011. Starting in August of 2011, I've been working on a different bigger project, mentally I've been busier and had less left-over concentration to work on my blog scripts.
However, I've been working on it a lot in the past four days here at my parent-in-law's for the holidays. Thursday and Friday I posted 8 entries that I'd been meaning to put together for the past few weeks. Yesterday and today I've been working on hammering out the script that converted the original export file that blogger created for me in 2008. Today I finally ran that and it was able to pull all the 450-odd entries that I'd had in the old blogger blog. This evening, while watchin football, I ran the script that converted the pivot entries, and also the one that converted the blogger entries. The embedded photos were located in different directories, so I had to carefully combine the two sets of entries to get everythin to work right.
So there might be a few nits here or there, but as of now, I have all the entries from all three major phases my blog has gone through, all working and indexed using the main interface, the one I wrote. It's a bit clunky, but it works. There are the originall bloggger entries, the pivot entries, and the current flat file blog entries.
Happy Holidays, everyone! And happy blogging. :-D
One thing I really like to have in a car is a warning buzzer than tells me when the headlights are on when I open the door, so that I don't leave the lights on and drain the battery.
My vintage Beetle never had such a circuit. It did have a buzzer that would buzz if you left the key in and opened the door. And it also turned on the dome light when either door was opened, independent of anything else. However, the switch to make both of those things work independently is a switch you can't get any more. It's a double-pole switch that switch the circuits independelty, and neither of them to ground. The only switches you can get for the doors are single-pole grounding switches. So the circuit to do all of this with a single switch per door gets a a bit more complicated.
I've designed a circuit to do the job. I want to have the buzzer go off if I open the door and any of the following is true:
Here's the circuit; two relays (they can be small ones) and four
diodes. Now I just need to get all the connectors organized and the
wires run, and the componnets wired up.
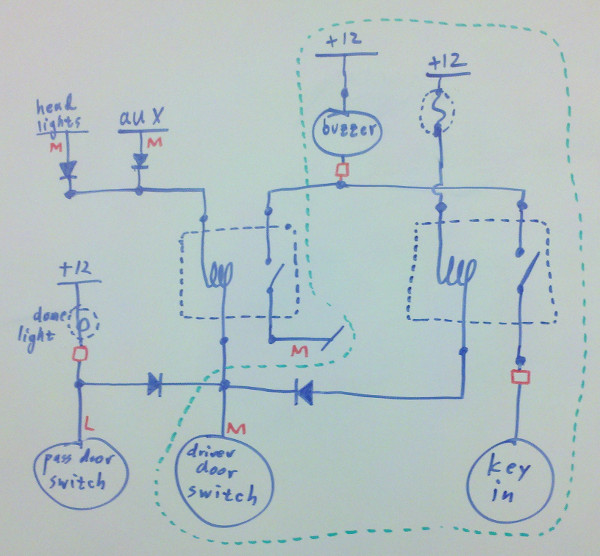
The only problem with this is I haven't been able to figure out to
wire the relays so that if either the door is opened or the key is in,
there isn't current being drained from the battery. Ideally it would
only draw when both were true. But for the moment, I'll have to put
up with a bit of current draw when the door is open, even if the dome
light is turned all the way off. That's probably not that big of a
deal.
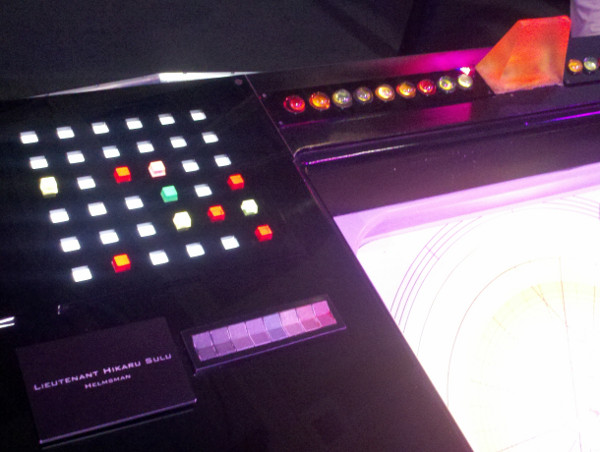
I mostly don't talk about my job here, but I think I've mentioned that I go to a big computing conference every year. This year the Intel booth had a really great exhbit--they leased (or something) the real live original bridge set from the original Star Trek series. If you went to one of their talks, you could go and hang around the bridge and take pictures and stuff. I'm going to post a couple of the pictures here, to have a record of it.
Mr. Sulu's helm station on the bridge.
The navigation console on the bridge.
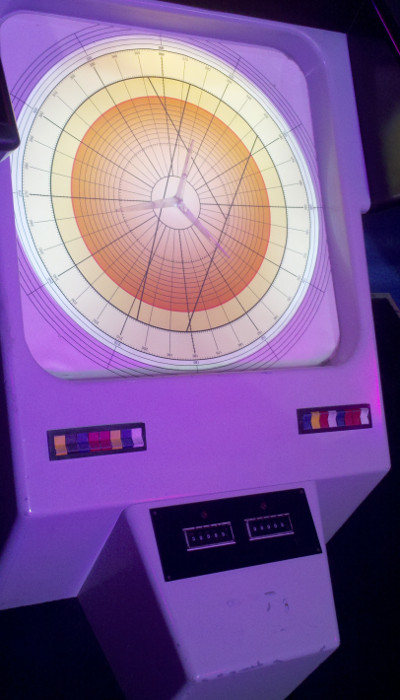
Hey George, I'm in your spot! :-D

The new plane has two GPS navigation units. I don't think I would have made that choice in configuring it, but it will be fine for the moment.
GPS units used for IFR flight must have current navigational and waypoint and airport information to be legal. The unit itself lives in the panel in the airplane, but the navigation data lives on a flash-memory card that sits in a socket in the front of the unit that's removable.
The information is updated every 28 days, so you need to remove the card from each unit and program it with the updated information. Most people have two of each card, and swap them out every time the information is updated. The seller of my airplane had two cards for each GPS as well, and a programming unit that will interface with either type.
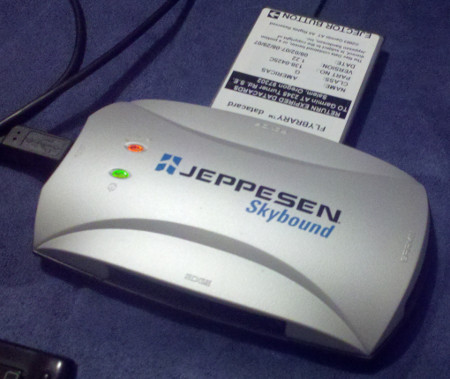
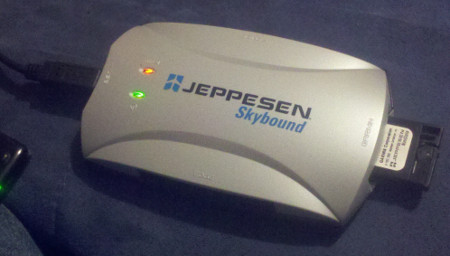
There's a company called Jeppesen that packages the information into a
form that the GPSs can understand. I downloaded their software and
bought one update for each of the two GPS units in the airplane:
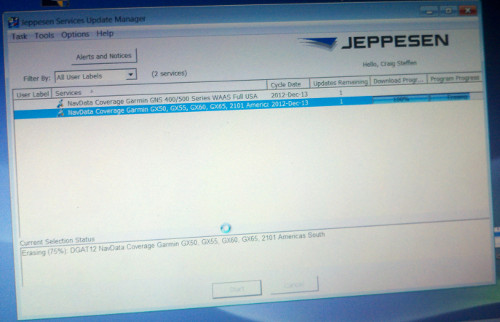
The older of the GPS units is an Apollo GX-60. It was designed by a
company called "II Morrow" which has since been absorbed by Garmin.
This one is an old-school unit; its screen is monochrome and it has an
older-style interface. Its memory card is a PCMCIA memory card.
PCMCIA is a expansion bus that used to be used by laptops a lot.
Here's the Jeppesen programmer writing data to the GX-60 card:
The other GPS is a Garmin 430W, a relatively modern GPS unit (6 years
old or so). It has a multi-color screen and a relatively modern
interface. The data card for the Garmin units is a proprietary card
that's only available from them.
Boy, it's been a busy month at work. We have a big review tomorrow and Friday. A lot of the last month has been preparing for it. And in there was Thanksgiving. And in there I decided to buy an airplane (but that's another post).
One project that I'd had in the pipeline for a while but I just had't gotten all the pieces together was to create a temperature logging gadget for my vintage Beetle. I'm very curious as to how things warm up and cool down when it's first started, during driving and afterwards. So I'm going to install an Arduino data logger in the car, and instrument it with lots of temperature sensors so that I can download and graph data from it. There may be interesting things to learn there.
I've had an Arduino Mega for a couple of years but I've never really done anything with it (yet). I did buy a protoshield which is somethin that plugs into the Arduino board's sockets but allows you to solder things to connecto the Arduino withould making the connections permanent.
The Arduino Mega is on top, the protoshield is on the bottom.
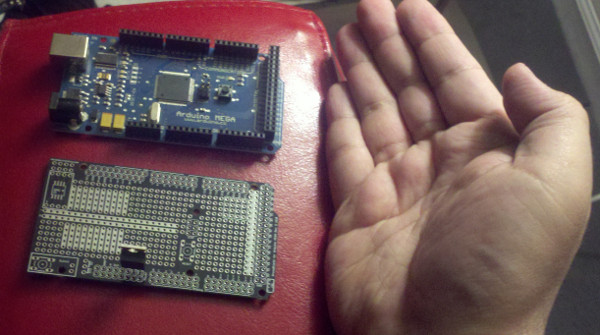
You can
sort of see the power rectified that's sticking up from the
protoshield. It will drop the voltage from the car down to 8V. The
Aduino likes to get somewhere in the range of 7 to 9 volts as input
and then regulates it down to 5V internally. The documentation says
that higher voltages aren't really recommended, which is wny I'm not
driving the board directly with the 12V from the car (which can get as
high as 14.5V or a bit higher when the engine is running fast.)
The Arduino itself is a microcontroller; it's a processor with inputs
and outputs. Not very interesteing just that; it can blink lights,
that's about it. Along with the protoshield, I bought two add-ons
that will make it into a good data logging device. Once is a
real-time clock:
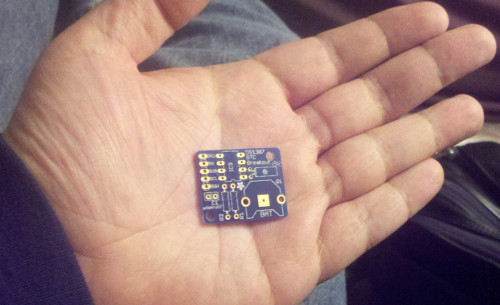
That's a battery-run clock, like the type that's on a computer's
motherboard, that tells the computer what date and time it is when
it's powered on. The real-time clock allows the Arduino to put a time
and date with each measurement it records, so that the sequence and
spacing of the data is understood.
The other component I got is a micro-SD card reader:
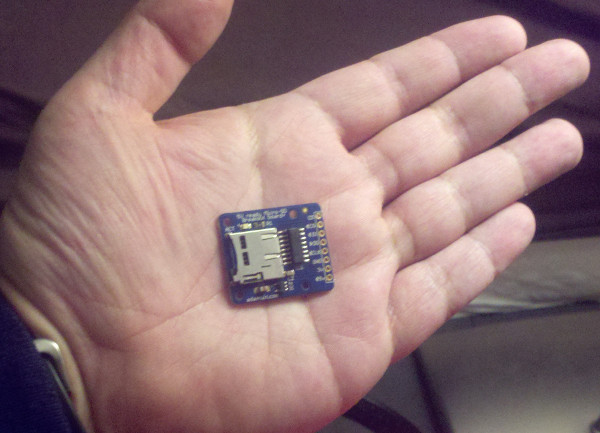
I can put a micro-SD card in the jack and once that's wired to the
Arduino, the Arduino can open files on the micro-SD and write data to
them.
The first thing I'll measure is temperature. I bought a bunch of temperature sensors, but they're boring so I didn't take a photo.
The goal here is to be able to print out all kinds of information to see how my car is doing more precisely.
I have a compulsion--probably mostly from my scientific training. I like to visualize data. I think that looking at a graph is much more compelling than looking at a series of numbers.
In that vein, I've plotted the number of hours of I've flown per quarter before. The last time I tried to generate a new version of that graph, I couldn't figure out the sequence of gnuplot commands to make the graph work right. I've found it again, so here's the up-to-the day current graph for my flying, and also the commands used to create it.
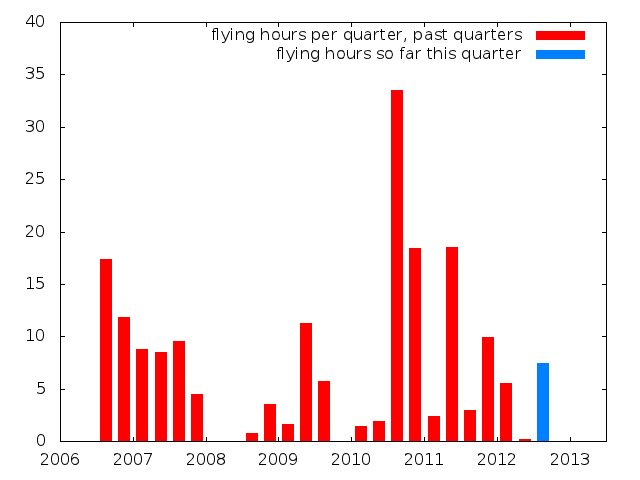
Here's the gnuplot session used to create that graph:
gnuplot> set xrange [2006:2013.5]
gnuplot> set yrange [*:40]
gnuplot> set boxwidth .15
gnuplot> plot './hours_flown_quarters.dat' with boxes fs solid title 'flying hours per quarter, past quarters', './hours_current_quarter.dat' with boxes fs solid lc 3 title 'flying hours so far this quarter'
I've gone through through the process of having my twitter stream post to facebook at least three times now. I'm documenting it in a blog post so that I'll be able to look it up if I need to do it again.
Thus endeth the lesson.