Site Navigation:
Craig's twitter feed:
I took a work trip to Pittsburgh, PA last week. It was for a computer training seminar, so I spent it indoors without much chance to take photos.
I noticed a rather odd thing driving up. All the way across eastern Ohio, there are signs for the city of "Wheeling", which is a small-ish city on the east end of I-70 within Ohio. Just across the border into Pennsyvania is the Pittsburgh metro area, which is much larger and would make a much more logical choice for "this highway to" signs. I presume some Ohio administrator decided at some point that they didn't want to point people to a city in aother state, no matter how large or prominent.
It was a rather dreary cloudy day, so my phone camera wasn't coping
very well with the low light. That coupled with the fact that take
these photos use-the-force point-and-shoot style meant that I didn't
get very many usable photos at all. Here are a couple from the drive
up:


My purpose for this post is this photo. I'm told this buildin in
central Pittsburgh is called "The Cathedral of Learning"; I think it's
a building in the University of Pittsburgh. It's really quite
something. I hope I get a chance to go inside sometime.

The late lamented RS "Bob" Hoover (the VW guy, not the famous pilot) was fond of saying that "your'e the mechanic in charge". My take on what he meant was that no matter what any expert may tell you, you're the person on the spot who has the ability to see what's what. You're ultimately responsible for your work, not the people on the internet trying to give you advice.
I try very hard to keep those words in mind when I work on my vintage VW. The problem with any vintage vehicle is it has a mix of old and new parts, and both sets have been maintained by different people with different levels of skill and care. ANY time you install or replace anything in a vintage car, it's vital that you don't just slap it on, you must work mentally work through what that thing is going to do, and how it relates to the parts around it. You need to anticipate what might to wrong and investigate it (by moving the part, or checking the configuration, or whatever). If you just fasten it on and don't think about it, if it turns out to be NOT an identical replacement, it will fail or jam at the most imopportune moment. Then you'll be faced with digging out the error and figuring out what you did wrong and then put it back.
My case in point was carburetor floats. I assumed they were all the same. I've dis-assembled and re-assembled carbs at least a dozen times since I've owned my vintage VW, and up until last year, the float wasn't something I ever thought about. Last year, I did a few hundred miles of test drive in my car. In preparation for doing so, I assembled a carburetor, just like I had many times before. I drove it on several test drives, ending with a 200 mile drive that included about 30 miles on the interstate. The next time I drove the car, a few days later, I backed it out of the garage, it died and wouldn't start. I spent the next week fighting with the carburetor and fuel pump. I'll use a more recent carburetor to illustrate what happened.
Here's one of the recent carburetors that I've built. Although the
float bowl is dry, I'm holding it up at the hinge so that it sits
about horizontally, where it would sit if there was gasoline in the
bowl. You're looking down at the float bowl; the top half of the
carburetor is removed. The float is the dark colored rectangular
piece; its upper corners are marked with green dots.

The float can slide a little bit to the right and left on its hinge
pin, but it's in no danger of scraping the sides of the float bowl
(marked with red dots). The float can ride up and down freely (fit
and function).
The trouble I had last year with the carburetor build was it seems
there are multiple sizes of carburetor floats of this type in the
world. The float of the carb that I had a problem with just just a
teeny bit longer (about 1.3mm longer, IIRC); its far edge was about
where the red line is marked on the same photo:

You'll notice that the upper left corner is very near the edge of the
float bowl. What had happened was I'd put in a slightly larger float
without realizing it. I didn't thorougly check its range of motion.
I then drive the car several times, including a long trip, and had no
trouble. Suddenly, one day, the float drifted to the left a bit,
scraped the edge of the bowl and sort of wedged there. When the float
is in its upper position, it closes the needle valve so no gas goes
in. So the engine wasnt' getting gas.
I have no idea why there is a different size of carburetor float; maybe its for a completely different carburetor, but someone happened to put it in a VW carb, and so it ended up in my parts bin. But I didn't carefully check its fit, and that could have stranded me somewhere.
And now an excuse for some pretty pictures.
For those who don't know the specifics, a carburetor is a fuel metering device. In a carbureted car, the air coming into the engine goes through the carburetor before going to the cylinders. The carburetor mixes fuel mist into the air stream so that the air/fuel mixture that arrives in the cylinders has the proper ratio to burn and drive the engine. Carburetors are sort of complicated in their design because they must provide a proper fuel/air mixture over a wide range of temperatures, engine speeds, throttle settings, and other parameters.
Modern cars put fuel into the air with fuel injection systems, which decide how much fuel is appropriate for each situation using an electronic look-up table. However, a carburetor does this by mechanical parts that change their behavior depending on the conditions.
One behavior in particular that engines have is that when the engine itself is cold, fuel going into the engine tends to condense on the inside of the intake manifold, which means some of it doesn't get to the cylinders. This causes a "lean" running condition (not enough fuel per volume of air) and the engine doesn't run as well. Carburetors typically compensate for this using what's called a "choke". It's a flapper valve at the entrance to the carburetor. When closed, it restricts the air flow going through the main part of the carburetor. It doesn't actuall "block" air from going through, but it does create suction in the middle part of the carburetor so that more fuel is sucked into the air stream.
Here are a few photos of what we're talking about. Here's a few down
the throat of a 34PICT-4 carb.

Up on the photo is toward the front of
the car, right is to the right. The forward (top of picture) part of
the carb is the fuel bowl; it's marked with red dots on this photo.
The thing on the right marked by green dots is the part that controls
the choke; we'll talk about that in a bit.
This air passage that goes from top top bottom in the carburetor;
we're looking down from above.

Closest to us is the choke, shown here completely open; the shaft is
marked with blue dots. Farther down the throat is the venturi (green
dots), which is a restriction that causes air flow to drop in pressure
and suck air out of the fuel nozzle, which is marked with red dots.
At the bottom of the carburetor, farthest away from us, is the
throttle, which controls how much fuel/air goes into the engine
(that's connected to the accelerator pedal). The throttle shaft is
marked with yellow dots.
Here's the same view, showing the choke closed.

One question is how is the choke controlled. Well some vehicle/carburetor combinations have a manual choke; there's a control that opens and closes it. You'll see manual chokes on things like chain saws or small gardnen equipment with gas engines, or early carbureted cars. After the 1950s or 60s, most cars had an automatic choke of some sort. It would start with the choke mostly closed, and then open it slowly. The carburetors in air-cooled VW engines used a thermo-electric choke.
Here's the electric choke element from a 34PICT series carburetor

The middle of the choke element is a bi-metallic spring. When cold,
the spring holds the choke closed. When the spring heats up, it
slowly opens the choke over a period of a bit over two minutes. The
spring hooks the end of the choke control arm right where it's marked
with a red dot.
The bi-metallic spring in this carburetor doesn't respond directly to the heat of the engine. It's heated by an electric heater element, indicated by the green arrow in the above photo. When you turn the ignition key to "on", battery voltage is delivered to the heater element through the tang on the outside of the choke element (marked by a blue dot). So the thermo-electric choke basically acts as a timer, opening the choke steadily.
I got a bunch of carburetor work done this weekend. I installed a 34PICT-4 in my vintage Beetle and ran it on Sunday. I realized on Saturday that I'd put in the throttle plate upside-down, so Sunday I fixed that. The carb's not running right, but perhaps good enough to be an on-the-road spare. Later Sunday I spent time deciding if I could resurrect one of the other 34PICT-4s that I have to replace it.
A quick illustration so that people can see what I'm on about. Here
are two carburetors, a 34PICT-3 on the right (that's the most common
carburetor for the dual-port aircooled engine), and the 34PICT-4
(one-year-only California spec carb) on the left.

You're looking at the left side of each carburetor. The forward part
of each carb (to the left in the picture) is the float bowl, where the
gasoline sits. The 34PICT-4 on the left has the thermostatic valve
circled, and an arrow points to the corresponding point on the right.
Pangur feels about the same way as most mechanics about carburetor
work.

Here's the engine running with the 34PICT-4 on Sunday.

You can just barely see the tell-tale brass plug that is the external
part of the thermostatic valve.
I've spent a lot of time digging up test equipment to use on my
vintage Beetle. It turns out that there's a modern tool that has the
tachometer and dwell functions and ALSO is a timing light. It's an
Equus
5568 timing light, but it has all the other functions built-in.
Here's mine in use:

I'm trying to rehabilitate a couple of the old 34PICT-4 carbs that
I've bought. I tried running them through the dishwasher; that
cleaned them up a bit, but not dramatically.

The problem with all the carburetor's I've had to some degree is that air leaks into the carburetor around the throttle shaft. This messes up the fuel-air metering and makes the idle unstable and difficult (or impossible) to adjust. The 34PICT-3 that is currently my one good carb has had its bushings replaced. I had the 34PICT-4 that I'm attempting to use re-bushed as well, but perhaps it wasnt' done correctly, or something went wrong.
So what I'm doing now is I'm cleaning up one of the used 34PICT-4
carbs I have and I'm going to see if I can re-bush it myself. Long
ago I bought a set of solid brass throttle shaft bushings from someone
in England who had some. I'm goin to try installing them into the
best 34PICT-4 that I'm cleaning up. Here's a pic of dry-fitting the
bushing into the throttle bore.

So hopefully next weekend I'll see how much of a difference I can make
with that.
I'm certainly not unique in having had posters of Lamborghini Countaches on my walls when I was a kid. I'd probably still have at least one around, if I hand't lost a bunch when got some water in our basement in 2005.
The design is frankly kind of crude. It has very little aesthetic sense whatsoever. The body is all flat panels; like the designer started with clay base and then whacked off facets witha matchete. It's a bit like a formula-1 car stretched sideways sot hat it has two seats.
I've had a re-surgence of interest in high-end cars in the last few years, watching Top Gearon BBC TV, where they drive those types of cars all the time. Interestingly, a lot of their take on the Coutach as a car to own is negative. Jeremy Clarkson is the mouth of Top Gear (he's described himself as the "bombastic one" among the hosts. Interestingly, he's written an editorial on why NOT to buy a supercar at all; that it won't improve your love life, and so on, which is very interesting for someone in that business. His article includes this:
This is because, when you are in a supercar, you can resist stabbing the loud pedal for very long periods of time but eventually, you'll think, "Hang on. This bit of road looks appropriate, I'll open the taps." And that's a mistake, because no road is appropriate really for the savagery that results. Quickly, then, you will soil yourself.There's also a segment of Top Gear in which Jeremy basically lays it out that the Countach "was never a good car" at all.
And I know all that. And I probably wouldn't like driving one
anyway. And given that only slightly over 2000 were ever made, and
they still sell for not less than $120,000, and insuring one is
astronomical, there's no way I'd ever be able to afford one. And yet,
I still find them compelling. I bought a couple of books on them
recently, because I was buying stuff on Amazon.

The cover picture is the LP500 prototype, of which only one was ever
made. It's a fairly photogenic car if you like that sort of thing:

Now many years later, what this book has pictures of that I haven't
ever seen is the incredibly integreated drivetrain:

It's technically a "mid-engined" car, which means that the engine is
between the transmission and the final drive. I'd alwyas imagined
(and drawn) that the transmission had a piece that stuck out to the
side and the drive shaft ran back beside the engine. Well that's not
the case; the transmission/engine oil pan has a passage at the bottom
for the drive shaft to pass through. This means that the
transmission/engine/final drive system must be removed from the car as
one massive piece, with special jigs, rather than being able to remove
and work on one of the three in isolation.
Coming full circle--the REAL reason that the Counatch is part of the furniture of my mind is less because of the car itself, and more than it was in a bad 1980s TV show called Automan. The show was sort of a reversal of (and ripoff of) the ideas of TRON; a computer character comes into the world (and fights crimes and solves mysteries and the usual stuff). In addition to Automan himself, he had a "cursor" that could create physical objects, including vehicles. Vehicles that weren't specifically desguised to make them look "real" were basically physical wire-frame models. The (cursor-created) car that Automan drove was a Lamborghini Countach LP400 with the wire-frame treatment. The car was super-powered, and could make instant 90-degree turns at any speed; a standard gag was to show the interior of the car during these turns, which didn't effect Automan at all but the human occupant got slammed sideways.
I got some time to work on the new carburetor for my vintage Beetle
over the weekend, so that's nice. I cleaned all the small parts that
have gasoline in them; there they are set out to dry.

Keep an eye on
the thermostatic valve at the top just right of center; we'll be
seeing that again.
During the assembly process. Judging by the look on Pangur's face,
I'm obviously doin it wrong.

To me, it seems like it actually starts to become a carburetor rather
than a collection of parts when the float is in the float bowl:

The reason that I'm assembling a fairly rare 34PICT-4 carburetor rather than the much-more-available 34PICT-3 is that the -4 has thermostatic valve that increasess the amount of gasoline that comes out the accelerator pump when the carburetor body is cold. I'm hoping that makes the car work better when the engine is cold, particularly when the weather is cool out.
For that to happen, the thermostat valve that I install has to actually work. I ended up buying a couple of 34PICT-4 carbs, so I have three thermostatic valves. On Sunday I basically decided that none of them worked. I did some digging on the internet, and e-mailed some people, and posted on forums, and came to the conclusion that all three of the valves I had were broken.
The part that's supposed to move is down inside the valve, but you can
get at it with a punch. Figuring I had nothing to lose, I put one of
the valves in my bench vice, stuck a flat punch down inside, and hit
it with a plastic mallet.

(The arrow points to the thermostatic valve.) No change. I hit it really hard with a
plastic mallet; again no improvement. Finally, I hit the punch really
hard with a steel claw hammer, and it gave. I was able to break the
ball valve free of its seat. So I know have what seems to be a
working thermostatic valve. When I get back from my work trip I'll
try and assemble the carb to see if it will work.
My wife and I took a short weekend vacation over the winter to the
Sevierville, Pigeon Forge, Gatlinburg area of Tennessee. While we
were there, we visited the
Hollywood Star Cars Museum in
Gatlinburg. It has some interesting cars from movies or owned by
movie stars. It also has some other interesting artifacts, like the
Batcomputer from the 1960s Batman series:

They have a neat array of props from James Bond movies, including
a Golden Gun prop from "The Man With The Golden Gun":

Among its vehicles, it has one of the motorcycles used in "Terminator
2". It's a 1990 Harley Davidson Fatboy. I took this image of the
overall bike:

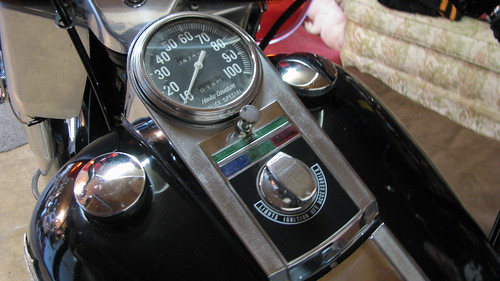
And then one quick shot of the instrument panel

Because my wife really isn't into car museums.
I late found myself looking at the second photo a lot on my phone,
looking at the speedometer and light panel:

The bottom of the panel, just below the key switch, are very clearly
warning and function lights. The red light in the lower rightis
probably the oil pressure warning light. The green one in the center
bottom is probably the "neutral" indicator light. The lower left blue
one is probably the high-beam headlight indicator. But are the other
colored things in the next row up lights, or just trim?
It took me a while to figure out why this one photo of this motorcycle was obsessing me so (meaning a couple of hours for an evening googling photos trying to find better depictions). My revelation was--I'm obsessed with instrument panels of vehicles. I'm not sure why this was a revelation. Whenever I got on a trip I take pictures of my own instrument panel, or particularly of the rental car I'm driving. One of the things that facinates me about my vintage Beetle is the extremely austere instruments: one speedometer dial, which an embedded fuel gauge, and two warning lights. When I look at an airplane for sale, I want to look at the instrument panel more than pictures of the outside of the airplane.
I found an few interesting depictions with Google image searches: an article on howstuffworks.com on the Harley Fatboy, and another specifically on the "grey ghost" on harley-fatboys.com.
Then I started doing some searches on YouTube, and ran into some interesting stuff. Here's a couple of videos featuring someone starting and running a Fatboy where you can see the instrument lights when they turn on the ignition: here and here.
After I ran into those examples, I did some more thorough searching for images, sometimes including for-sale sites. Here's a for-sale ad for a 1992 Harley Fatboy in Tennessee. If you click on the "more photos" link, the middle photo has a nice view of the speedometer/instrument cluster in bright light.
I found
a very nice image of the tank and speedo by Carl Johan on flickr:
I found some other photos on flickr,
including
this one by Stacey Warnke, which I think is the very same
motorcycle. The other photos near it in her photostream are of other
cars in that same museum. The image shows the odometer milage of 727
miles, and the page says the photo was taken on July 31, 2008. The
odometer in my photo, taken January 2012, lists has 732 miles:
